Ahhh my first flight of 2012! Also my first flight since the start of November, yikes. Reminded me why the FAA mandates check rides every few months for proficiency, especially considering some of the mistakes I made on this flight. Thankfully I was able to run my computer at 4.5GHz again after accidentally wiping out my overclocking settings a few weeks ago. I didn’t remember I had included details as to how I set up my overclocking in a previous Flight Log entry until I looked back and so getting it setup and running again was easy. Phew! Those extra megahertz do indeed make a difference in performance!
So the objective of this flight was two-fold. One: to get in some night time flying, of which I don’t have many hours logged. Two: to visit some of the airports I’ve designed and released over the last three months.
This was originally supposed to be two legs, from KFWN to KMMU and then on to N73. However I decided that KMMU was way to close to fly to, even for a touch and go – too much too fast for me to handle after just hopping back into the cockpit after a while on the ground. The longer flight from KFWN direct to N73 gave me more time to get back into the groove from takeoff to landing, especially considering I was flying the quicker Bonanza V35B.
The first attempt at this leg is where I made my first mistake by failing to visually inspect my aircraft for properly operating navigation lights. Granted it’s not something that’s on any of my checklists, but it is now! After departing and climbing to cruise altitude I stepped outside to capture some photos and noticed I was running without any lights – strobe, navigation and beacon were all not showing up. Realizing I couldn’t continue into growing darkness without navigation lights, I immediately considered landing at a nearby airport but I was at 5ooo feet and didn’t want to descend to anything right beneath me. I decided instead I still had enough light to turn around and head back to Sussex – bonus would be the sun would be behind me illuminating my instruments as I found my panel lighting also to be malfunctioning. So I backtracked my VOR radial and entered the pattern, cutting my downwind leg a bit short to beat in an aircraft on direct approach – I tried to clear the runway in time for him to land but he waved off just as I pulled onto the taxiway. Sorry dude, but my situation was bordering on emergency with coming darkness and I had to get to ground fast. After pulling up to the repair hangar I shut down and troubleshot the problem – turns out the new updated aircraft.cfg file released with the optional patch had the light positions all wrong for some reason. I replaced them with the light positions from the original .cfg file and all was right again.
So a bit later I was back in the cockpit and once again leaving Sussex behind and climbing for FL05. There was a crapton of traffic still in the air so I called into NY Approach for flight following and I tracked towards my VOR. As I was just hitting the VOR and getting ready to turn east I ran into a small bank of clouds at around 4700 feet, luckily there was a gap between them that allowed me to circle around and resume course without breaking VFR or changing altitude. As I approached the NJ Turnpike I switched off instruments to visual navigation, tracking the Turnpike southwest and trying not to lose it as it snaked past several other major highways. I personally find it a lot harder to identify roadways at night. After intercepting the Turnpike I also began a nice slow descent while NY Approach handed me off to McGuire Approach. I used flight following until I dropped to around 2500 feet and was closer to N73 when I switched to McGuire for a weather report. However it seems ATIS at KWRI is non-existent in FSX so I simply fell back on my weather planning I had done prior to flight and overflying the field to check the sock. My weather plan was spot on and I made my planned approach to Runway 23, coming in a bit high on final causing a little dive towards the runway but still had plenty of roll out and managed to give the Cessna behind me enough time to land afterwards. Once parked and shut down, reviewing my flight made me realize I had forgotten to do an ident on the VOR to ensure it was properly operating and that I was in fact tuned to the right station. Luckily (this time) it wasn’t an issue.
Leg 2: N73 to KBLM
The next morning it was up early and into the Tailwind W10 tri-gear, which was designed by Lionheart Creations. It’s a nifty little plane and I hadn’t really flown it more than once or twice since I got it during a sale so I figured I might as well take it out again. I got into the cockpit and went through a modified preflight – it doesn’t come with its own checklist they just ripped the Cessna 182S one from FS9 – but had trouble getting the engine to turn over. I think this is from the V35B having only left/right fuel tank selection, so when I reloaded the flight from last night and switched aircraft, the Tailwind effectively had no fuel flow since it only has a single tank (or two with one feed, dunno for sure). Eventually I just reset the flight with the aircraft already running. My first impression is that the volume for everything in this aircraft is a lot louder than the other aircraft I fly. The fuel pump, for example, is a loud as the engine itself. Also when toggling the panel lights with a keystroke it doesn’t toggle the dash switch. So if you toggle the lights on with a key then click the switch on, the panel lights will go off.
After fiddling around a bit more and getting used to the instrument layout I taxied towards the runway but after the heavier V35B I wasn’t ready for how quickly this aircraft accelerates and ended up crashing into a hangar. Whoops. Luckily damage was minor and I was able to get back to taxiing in short order, keeping a lighter hand on the throttle as I did so! Once departed from Red Lion it was a quick climb to 1500 feet cruise – this sucker is indeed fast! But once you get it leveled and trim it’s very stable and well behaved. Switching to spot view for some pictures I didn’t stay long because the outside engine noise is on a blatantly obvious loop lasting only about 3 seconds – it was pretty annoying. As I approached the coast and throttled back to slow down and drop lower for a buzz past Barnegat Light I also noticed no real discernible change in engine pitch until I had throttled down to near 50%. Oh at this point too I realized I had forgotten to continue my checklists after takeoff and upon returning to them I realized I still had flaps down from takeoff. And the VOR I used to track out to the coast? Didn’t ident. GAH!!
After following the coast north I made a direct approach for Runway 32 at KBLM after calling in and checking the weather matched the report in my plan. However on final another aircraft decided to ignore the fact that I had been announcing my approach for the last 10 minutes and taxied onto the runway for takeoff. I tried to slow down to let him go ahead of me but ended up having to call a go around. My second time around there was more traffic departing but thankfully they were kind enough to wait for me to land. However I then went and flipped the aircraft as I tried to rush and exit at the nearest taxiway. Although I will say I thought for sure I had slowed down enough to make the turn, apparently I hadn’t – no doubt my inexperience with the aircraft led to this disaster. I should probably have handled it with more care not having flown it much huh?
Leg 3: KBLM to KVAY
So technically I made it to KBLM and was totally not in the mood to try that entire leg again so I just hopped into the ol’ 172S which I had left stashed in one of the long-term hangars north of the airport. Before that though I reset the time to bring the sun up a bit more. I realized a bit later that since FSX was designed prior to the recent Daylight Savings Time changes, when I set the clock to real-world time it would put it an hour behind and not expect dawn to arrive until 8:21 instead of 7:21.
After the disaster of Leg 2 this leg was. thankfully, much nicer. I had no troubles departing KBLM and after reaching cruise I even remembered to finish off my checklists and ident the VOR I was tracking towards. Then it was just time to sit back and enjoy the sunrise and watch the traffic moving about the sky around me. Once I hit the VOR I began a gentle descent that put me near pattern altitude as I approached KVAY, which is bunched up with Flying W N14 and Red Lion N73. I threaded over both runways which set me up nicely for a pattern entry to Runway 08, although I was a bit off on the altitude I otherwise flew the pattern without issue, ending up on slope and centered as I turned final. I made sure to stay on slope to clear the power lines in front of Runway 08 and came down to a slightly bumpy landing.
Since KMMU was the only recently-developed airport I didn’t get to visit, that will be the target of my next flight, though I’m also working on a small grass field a little ways south as well that I might take a small plane to and back, and then cruise up past NYC to get to KMMU and then take a helicopter into the city? We’ll see.
Forecasts were good for the Quadrantid meteor shower set to peak this morning so I decided to check it out since this was one of the yearly showers I had not yet witnessed. Of course, although we’ve been having very above-average temperatures around here the past few weeks last night it decided to plummet close to the single digits, with windchill on top of that to bring the “feels like” temperature forecast from Weather.com down to -2°F. Man I thought I had on enough layers – I was wrong. I was out on the roof just after 2am and 15 minutes later I was back inside getting scarfs for my face. A little over an hour in and my extremities started to hurt. Close to an hour after that, just before 4am, I saw my 25th meteor and called it. When I got back inside I didn’t warm up until I had stripped off most of my outer layers because they were so cold the heat from inside the house wasn’t reaching me!
So the shower itself was about average. 25 meteors isn’t so bad for my neck of the woods. Unlike some other showers like the Perseids that are known for fast meteors, the Quadrantids have slower moving, brighter ones. Indeed that’s mostly what I saw whenever I caught one. The ones that burned bright and long across the sky were quite beautiful. One was definitely throwing off a noticeable blue glow. It’s really hit-or-miss for me since I have a lot of light pollution so when a dense shower is forecast I have to hope that most of the dust particles are large, but not this time. I’m sure people way out in the mountains saw 3 times as many easily. One meteor either came at me head on or was an iridium flare, as a spot of light in the sky grew bright and then dimmed out. That was pretty cool. Most showed up around the tail of the Big Dipper.
This shower is very capable of producing meteors worth watching. Hopefully next year will be just as good if not better if I can catch it.
Are you struggling to lose weight? You’re not alone. According to the CDC, more than 70 percent of U.S. adults older than 20 are either overweight or obese. Unfortunately, there’s no quick fix when it comes to healthy weight loss. Losing weight and keeping the weight off long term takes effort and commitment. Check out these three keys to healthy weight loss.
Building muscle after a period of weight loss requires a balanced diet that includes a combination of protein, complex carbohydrates, and healthy fats. It’s important to continue strength training exercises to stimulate muscle growth, and gradually increase the weight and intensity of workouts over time.
1. Healthy weight loss begins first with a healthy mindset.
How will dropping excess weight change your life? Will getting healthy give you more energy for your family or more self-confidence at work? Envision achieving your health goals and write them down. Calculate your BMI and set a realistic weight-loss target to lose no more than a half of a pound to two pounds a week. Stay determined to reach your goals with these tips.
2. Changing your eating habits is a process.
There are some supplements that can aid weight loss by boosting metabolism, suppressing appetite, and increasing energy levels. Some popular weight loss supplements include caffeine, green tea extract, garcinia cambogia, and conjugated linoleic acid.
Extreme diet restriction is not a sustainable weight-loss strategy. Instead of cutting out too much too soon, start small with little changes. Swap fatty meats for lean meats. Buy fat-free or low-fat dairy products. If you’re going to order fast food, get something without the cheese. Each health-conscious trade you make will get you one step closer to your weight-loss goal. As we mention previously some supplements like the best diet pills combined with a healthy diet and regular exercise will help us reach our dream body.
3. When it comes to exercise, try everything twice.
Going to a new workout class can be intimidating. You may feel awkward or uncoordinated in front of a group of new people. It’s normal to feel this way. Don’t let first-time jitters sway you away from exercise. Try every new workout twice. Whether it’s a yoga class, cycling, hiking, swimming, or a weight class, give yourself a chance to get comfortable. Remember to get your doctor’s okay before beginning a new exercise regimen.
To start growing more muscle, there are several supplements that can be helpful like some legal steroids. When this pills are complemented with protein powder, it can help increase protein intake and support muscle growth. Creatine can also be effective in increasing muscle mass and strength.
With a healthy mindset, a gradual change in eating habits, and an open mind about trying new exercises, healthy weight loss is possible. Stay positive and celebrate your successes along the way. Once you reach a healthy weight, focus on maintaining weight loss. Baylor St. Luke’s Medical Group primary care physicians are an extension of your team as you journey to a healthier lifestyle. Schedule an appointment to discuss how you can best reach your goals.
If you’re unable to lose weight through diet and exercise, learn more about our surgical weight loss options in The Woodlands.
Do you want to learn how to take professional photos? Here are some professional photography tips that will show you how to make your pictures look more polished.
To inexperienced photographers, taking a great photo can seem simple: just point and shoot. But anyone who’s tried to learn how to take professional photos knows that there’s a lot more to it than that.
From choosing the right subject and setting up a cool composition to finding the best light, it takes a lot of consideration to capture a great photo.
If you want to take your photography to the next level, here are some tips to help you learn how to take good pictures. Once you get a hang of these basic pro techniques, it should vastly improve your results.
The best part about knowing how to take professional photos? It leads to new opportunities. The more professional-looking photos you’ll be able to produce, the better your online photography portfolio will look. And the better your online photography portfolio looks, the more photography jobs you will land. Get the best professional photographers for corporate events.
So, let’s dig in!
1. Master the Fundamentals of Composition
Choose a Strong Focal Point
The focal point of a photo is the main point of interest. It could be anything from a tree, to a building, to a person (or their eyes). Finding a strong focal point is one of the fundamental steps of how to take professional photos. So when you’re planning out or setting up a shot, you should stop and ask yourself, “What do I want viewers to focus on?”
Once you know what your focal point is, you can work towards making it as strong as it can be. Many of the composition rules below will help you create an interesting focal point that draws in and holds the viewer’s attention.
Follow The Rule of Thirds
Instead of positioning the focal point in the center of your shot, it can make for a more interesting composition if you follow the rule of thirds. This rule states that you should place the most important elements in your photos off center.
Imagine there’s a tic-tac-toe grid in front of your shot. That means two lines divide your frame into thirds vertically, and two lines divide it into thirds horizontally. You should place the subject and other important elements in your shot along these lines or at one of the four points where they intersect.
It’s one of the easiest ways to learn how to take professional photos. Instead of having all your portraits look like mugshots, this guideline can help you find a better balance between the main subject and background.
Use Leading Lines
Leading lines are line shapes in your shot that can help guide a viewer’s eyes to the focal point. They can be anything that creates a line in your photo, like roads, fences, buildings, long hallways, trees, or shadows.
The trick is using them take a viewer’s attention where you want it to go. That can include drawing their eyes straight to your subject, or leading them on a kind of visual journey through your composition.
The direction of your leading lines can also change the mood of your compositions. For example, vertical leading lines can convey a powerful, imposing mood, while horizontal leading lines tend to be associated with calm and tranquility. For more information on why this technique can help with taking professional photos, check out this guide on how to use leading lines in your photography.
Put Some Thought Into Perspective
Perspective has a massive impact on the composition of any photo. By simply changing the angle or distance you shoot from, you can totally change the mood and meaning of your images.
One simple way to see that is by shooting the same subject from above and below. A bird’s-eye view can make a person in your shot seem small, while shooting from below can make it look like the same person is now towering over you. Shooting from far away can make a person look insignificant, while getting up close and having them fill the frame can convey a sense of power.
So when setting up any shot, spend some time thinking about perspective. Don’t be afraid to walk around your subject to search for interesting angles, and see how drastically it can change the composition’s mood. It will bring you one step closer to perfecting how to take professional pictures.
Create Depth
Finding ways to convey depth is another important step in learning how to take professional photos. If you ignore this rule, your photos can end up feeling very flat and boring. The best way to convey depth is to include some elements in the foreground, middle ground, and background. So for example, instead of shooting your portraits with the person standing up against a wall, bring them closer to the camera, or find a better background with some depth.
Yea so it’s been a while since I’ve gone on a planned flight – and even this flight I’m blogging now actually took place back on October 22nd! Besides my airport scenery development I’ve also been busy getting started as an AVSIM staff reviewer – I’ve already written tworeviews and will be working on a third this month. Also at the time I was rather frustrated after not completing the entire flight I had planned out and that put me off blogging it right away. Then the rest of life caught me up in a whirlwind that still hasn’t quite set me back down.
I guess this flight was doomed from the start when I began planning it at like 2 in the morning. It was so long since I had planned a flight that I was forgetting things that needed to be done – my memory retention has never been all that great. So that slowed the process and to make things worse SkyVector decided to stop loading charts on me before I could complete my planning. Then I added to the problem by deciding not to sleep since it was by now after 4am and just get set to takeoff with the dawn and fly all morning/afternoon and then crash the rest of the day.
I started out in the Bonanza V35B out of Monmouth Executive, where it was parked last. Once airborne I had a simple VOR route plotted that would take me within spitting distance of Sussex. Weather was calm and clear and the VOR beacons came through strong and steady. I realize now that I completely forgot to tune into their Morse frequencies and identify that I was setting course towards the proper beacon – luckily that wasn’t an issue this time around (I have caught myself in earlier occasions of being tuned to the wrong VOR!). I did let my attention drift every now and then (sleepiness probably didn’t help) so I was banking left and right to get the course needle back to center, and of course thanks to the tip tanks keeping the wings level wasn’t made any easier. I probably should have topped them off before departing KBLM but didn’t bother.
I pulled int KFWN airspace right on target and flew the pattern around the airfield, lining up perfectly with the runway as I rolled out of my base turn to final. Sussex doesn’t have much useable runway left for landings these days – my theory is that to save money on repairs they’ve simply moved the displaced thresholds further and further towards the runway center. Anyways it’s best to land a bit fast in the V35B, so I touched down around 60kts and immediately had to stand on the brakes to come to a stop with just enough room to taxi off at the end of the runway.
Leg 2: KFWN – 1N7
Once I parked, shut down and saved the new location of the V35B I loaded up the American Aerolites Falcon, which was an aircraft I had recently reviewed. It’s a nifty little ultralight and I was going to make a short hop with it down the Delaware River to Blairstown – since the Falcon can only go around 55kts for a normal cruising speed. The falcon is a stick and throttle aircraft so I had to reconfigure my hardware setup a bit to get ready to fly, including some axis and button assignment changes as well. By the time I got off the ground the sun was fully up over the horizon.
The flight down the Delaware and to 1N7 was largely uneventful. I found the river okay and followed it down to the Water Gap, at which point I turned off the engine and glided down through the gap, enjoying the wind rushing past me before kicking the engine back on again near the ground and continuing to power towards 1N7. This I found through dead reckoning and flew the pattern down to land and taxi to a parking location. In doing so I ended up “below ground” and realized I would need to add a flatten polygon to this airport scenery when I revisit it sometime in the future.
Leg 3 Fail
Next it was time to load up a freeware aircraft in my library I hadn’t tried yet, a Cirrus SR20. It looked good at first glance, enough for me to want to try it, but ultimately proved to be less than adequate for my demanding sim realism needs. The controls, especially the radios, were hard to read and see, and every time you so much as tapped the brakes the whole nose would dip down like 2 feet as if you slammed on them instead. It was so bad that when I used the pushback function to move the aircraft backwards out of a parking space, when I stopped the craft tipped back onto its tail and stood there! I had to power up, start moving and tap the brakes to drop the nose back down. To add to my frustration I had forgot I had set my yoke/throttle null zones extremely wide to prevent dual inputs from being sent to the sim when I was using my joystick to control the AA Falcon while the yoke was still plugged in. So I didn’t have enough power, yoke control to take off when I rolled down the runway the first time.
Finally, after making it into the air clouds had moved in to prevent me from climbing to 8000′ like I had planned. Rather than go around I decided to go over – but at around 12,000′ I started losing climb performance and only then discovered that apparently this aircraft has an adjustable propeller pitch but couldn’t see a control in the cockpit for it. Regardless, I was beginning to get seriously tired and annoyed in general so I just shut down the sim right then and there, and went to bed.
Hopefully my next outing will be a bit more enjoyable overall 🙂 Hopefully it will be sometime soon as well… heh
This past week I was rehearsing and shooting for the film Magnus Rex in New York City, as I mentioned in my last blog post. Here’s what I’m able to say so far:
Rehearsal Days
These took place Wednesday and Thursday out in Jacob Riis Park on Long Island, which has a huge parking lot that we used as there were a lot of extras there. I hadn’t gotten wind of the scope of the scene we were shooting until after I arrived, checked in and sat down for the catered breakfast – it was then I noted the small line I had waited in at 7am had by now grown to at least three times its former size. It was now only about 7:20. It wasn’t until closer to 9am that all 500 or so of us were checked in and ready to go. There were two sides represented – the good guys (cops and SWAT) were wearing mostly white while the bad guys (thugs and mercenaries) were wearing mostly black.
We spent the first day in basic fight training, which harkened me back to the beginning of my Batman Show days. They let us pair ourselves up with a partner from the opposing side after forming us into our separate camps out in the parking lot. I was right across from a fit-looking older guy around the same height as me, so when they let us break rank to find a partner I went straight to him and grabbed his hand to shake it and introduce myself. Once Chris and I had exchanged greetings we waited until the stunt people separated us further into 50-person squads that would each be trained by two members of the stunt team. None of the stunt guys asked for prior experience and I didn’t mention that I had any – I figured they would see it. Sure enough, as the morning went on my partner and I were pretty much ignored by the stunt guys, who walked around giving pointers and lessons to the rest of the group. I spent the time passing on what experience I could to Chris when needed – fortunately he himself, while not having previous fight experience, was able to pick up a lot of the basics on his own.
Before lunch they had us separate back into our good-guy/bad-guy groups and gave us an idea of what would be happening in the scene we would be shooting the coming weekend. We rehearsed the action for a while before breaking for some catered lunch and rest. I’ll admit that my arms and waist were already starting to tighten up from throwing punches and reacting to getting hit – ironically enough my neck seemed to be just fine, which is usually the part that gets really sore from snapping back.
The afternoon was spent back in our groups rehearsing various fight sequences that would fit a brawl-type scene, and we also ran through the scene’s action a lot so that we could do so as a smaller group and fine-tune things. Chris and I also got some attention from the stunt guys as well as the fight sequences became a bit more complex. Later in the afternoon the stunt guys in charge of our group came around taking down names and putting stickers on the shirts of people who would be returning for additional rehearsal the next day. Both my partner Chris and I were selected, which was great because some people were asked to return without their partners and would have to find new ones.
The next day only about half of the people from Wednesday were back, and it was largely the same deal as yesterday except more detail was given to the fighting to really make sure everyone was throwing and reacting properly. Additionally, some of the extras were taken out to receive weapons training (both proper gun handling and actually firing blank rounds) and kill training. I was selected for the latter, and they had several of us from my group and others walk on mats and react to getting shot in both the head and the shoulder and taking the fall onto the ground. Several people fell backwards or flopped down on the mats and were reminded that they would not have this padding during the shoot. When I went down I tried hard to remember to use my contact points – knees, elbows, shoulders, hands, that would be padded. I did almost fall sideways off the mat once and was reminded that I should be aware of where I’m falling in general as well.
Once day two of rehearsals were over it was just a day off before shoot weekend.
Shoot Days
We were all warned about early call times due to the number of extras being used in this scene, so I was ready to wake up at 2 or 3 in the morning on Saturday. Luckily they worked the calls in groups alphabetically, so while people whose last names began with A-F had to report at 2:30 in the morning, my group of surnames weren’t needed until 5:30. This was also a great thing as my plans to stay up with friends in the city fell through and I would have to drive. So it was up at 3:30 and on the road at 4am – I got to the location at 5 but the parking garage closest to the set was full-up – the last car pulled in just ahead of me! So it was a 30-minute scramble to both navigate the city streets and find another garage in the area that wasn’t full – I finally ended up a good 15 minute walk off location but a cab was right there as I exited the parking garage so I was only 10 minutes late for call. Luckily it wasn’t that important I be strictly on time as there were still a lot of us to process and it wasn’t like I was holding up anything by being a few minutes late.
Six flights of stairs up the building led you to check in – talk about your morning work out! 🙂 They had signs posted on the wall at the top of each flight – “Good morning! Welcome to Magnus Rex” and “You’re almost there!” and the like. Once through check in it was down two flights to wardrobe where we exchanged our clothes for our costumes. Then it was down another flight to our holding area, which was divided into three groups – those that hadn’t attend rehearsal, those that had attended one day of rehearsal and those that had attended both rehearsal days. In here we could still use cell phones and have our bags to read books and eat or do whatever while we waited to be called out to set. The cops and SWAT were a floor below us in a similar holding arrangement.
It was cold out, and although the day warmed up a little it was generally chilly – luckily most of us like myself were costumed appropriately anyways. They organized us out on set by ranks – those who had attended both rehearsal days were up in front, those who had attended one day were behind and those who had not rehearsed were in the back. The idea obviously was to get the better-looking background fighters closest to the camera. Still, those all the way in the back might have been consoled a little to know that they were still part of something big – one of the Assistant Directors or Production Assistants (couldn’t tell who) let everyone know that we were officially in the books as the largest amount of paid extras used in a scene in NYC film history! I don’t have any official numbers but the rumors put it at around 1100 extras.
We spent the first day working all the way up until the sun was too low to shoot. Obviously there were numerous takes we had to go through to get things up to a level acceptable for the director, especially considering the number of people that were being used. We shot several different scenes throughout the day and we had lunch breaks in waves so that there would always be enough extras out to use on camera at any given time. At the end of the day they had us all return to holding and reversed the process we had gone through in the morning, letting the people who had arrived at 2:30am get checked out first. We all managed to get out in just over an hour – which pleased production immensely as they had expected it to take more like 3 hours to get everyone checked out.
The second day of shooting was similar to the second day of rehearsals in that only about half of the extras were called back to shoot some additional scenes and some closer shots of the scenes we worked on the previous day. I was able to park in the garage right down the street from the location this time and was early for my call, which was a bit earlier at 5am. The day didn’t last as long as Saturday, and we actually got our last shot in one take for a wrap.
Apparently production was extremely pleased with how the weekend went, and many of the ADs and PAs went to lengths to tell us they weren’t saying good job just to make us feel good or anything but that they really were happy with our performance and cooperation. Well, we get to wait and see now as the final result won’t be viewable until Summer 2012! Once the film hits the theaters (in IMAX!!) I’ll be able to post up more information about the scenes we were shooting. Until then, stunt-wise, we’ll see what comes up!
The evolution of technology is pushing the boundaries and changing how the world does business. Today, we’re accustomed to everything being online and right at our fingertips for immediate access. Through Amazon, the pioneer of fast-paced delivery service, it’s possible to receive a package less than an hour after ordering, depending on where you live. Improved technology has also increased productivity in the supply chain, minimizing costs and errors. These advances benefit all areas of the logistics industry: trucking transportation, international transportation (ocean and air), supply chain management, and shipment tracking. Here are five major technology advances that are changing the future of the logistics industry.
Shipment Tracking Systems
Previously, customers booked shipments, received an estimated delivery date and then were left in the dark, unless they decided to make a phone call. Today, internet and software advances allow customers access to shipping and tracking systems 24/7. Not only does this enhance the user experience, but it saves time and money for the company as well. Shapiro offers Shapiro 360°, a shipment tracking system tailored for our customers that allows to them to monitor and manage their shipments. It features shipment notifications and messages, customizable reporting, and customer accounts with information specific to the cargo destined to them. You can’t complain when technology is allowing us to do everything from the comfort of our couches. Improve your business logistical performance with these peterbuilt truck auctions deals.
Internet of Things (IoT) and Radio Frequency Identification (RFID)
Did you think years ago that you would be able to turn on your ceiling fan from your smartphone? Today, many devices are made with built-in Wi-Fi capabilities and sensors, from cell phones and ceiling fans to cars. The easy access to Wi-Fi and the internet connects everyone to everything, which is why it’s called Internet of Things. IoT is opening up many opportunities for the supply chain, such as reducing costs and delays by avoiding risks. Sensors are built into cabs, cargo ships, trains, etc., and connect to an alarm system or dispatcher that is monitoring and tracking. These sensors process and transmit the information to the crew who then gains insight into hidden risks and knowledge. Although IoT isn’t an entirely new technology, it continues to impact the future of logistics, allowing for a more accurate in-transit visibility and delivery of goods.
RFID technology, which has also been in use for a few years, is a popular labor-saving way companies can track their inventory. A tag or sensor is placed on the product and radio waves are sent out. The data is then received and processed by the company. Similar to RFID tags are barcodes, but the superior speed of information delivery and data processing of RFIDs is more appealing to businesses and the way technology is moving. Today, many companies are using RFID tags in their distribution warehouses to monitor containers. Other industries are already using RFID tags, such as the apparel industry and major theme parks.
Autonomous Trucks and DronesA world where a computer drives you from Point A to Point B or you receive a package from a flying unmanned aerial vehicle sounds like something out of a movie, but that is where we’re headed. Autonomous cars are already a reality with trucks not too far behind. Embark and Uber have already made long hauls using autonomous trucks, with Tesla releasing a truck this year. While it wasn’t completely driverless, with a driver in the passenger seat to monitor the computer, it is a huge step in this breakthrough technology and has the potential to increase efficiency in the delivery process.
Amazon has announced the future of packages being delivered right to doorstep by drones, called Amazon Prime Air. Drones deliveries are still a few years out due to regulatory measures and associated costs, but the thought of not having to sit around during a four-hour time span waiting for a package is pretty appealing.
Enhanced GPS Accuracy
Long gone are the days when you printed out directions from the computer before you left the house. Now almost everyone uses GPS, whether built-in on their vehicles or on their cellphones. The accuracy of these devices has drastically increased throughout the years, not only helping frustrated, lost drivers but also improving the supply chain. The advanced accuracy of GPS allows for increased productivity and satisfied customers, by tracking trucks’ locations and improving hauls through access to updated traffic data.
It’s that time of year again for the dust from comet Swift-Tuttle to come crashing into our upper atmosphere with spectacular effect. I wasn’t planning on starting the party early but the skies were totally clear tonight after some late evening clouds moved out so I decided to give it a go although the peak doesn’t start until tomorrow – I’m viewing from my backyard this year as my Adirondacks trip did not work out this time around. But still, the heavens did not disappoint! Even better is that there are clear skies forecast for both Friday and Saturday mornings as well. The only detriment is that the moon sets a bit later each day but there’s still a window of darkness before the sun rises. Know that the best times for catching meteors is from 3am-sunrise. We’re passing through a cloud of debris left behind by a comet that crossed our orbit, so as you spin to face the direction of Earth’s orbit (the night/day terminus) you’ll be heading more head-long into the cloud and thus more bugs shall splat into the windshield, so to speak. And before you go any further make sure you’ve read my meteor watching tips in case this is your first outing.
Happy viewing everyone!
The Preshow – 8/11
I rolled the lounge chair out onto the lawn at 3am to settle in. Given my amount of light pollution it would have been better to wait until around 4am but I wanted to give my eyes plenty of time to adjust. I spotted my first meteor just before 4am, a dim streaker shooting through Taurus. From that point up until I quit the field at 5am I counted 14 more for a total of 15 – not bad for the day prior to peak! One of them skimmed the atmosphere, which is cool because they last a good 2-5 seconds and track across a good deal of sky – you need to turn your head to keep them in view. You can see them dim and brighten as they dip in and out before burning up completely. Four others I saw were more head-on collisions – these meteors are the ones that leave the bright trails behind them as they burn up quickly – the bigger they are the longer they last. The rest were dim, quick specks – the kind you spot only if you happen to be looking at the right place at the right time as they aren’t bright enough to pull your view from another section of the sky. In addition to my 15 meteors, I caught a handful of satellites orbiting by overhead – most I spotted out of the corner of my eye since they are rather dim. Four of them however caught my attention thanks to bright flashes of light off their solar panels – really bright ones are usually Iridium Flares. To cap off the night, just before 5am a Jupiter-bright object soared across the sky. No commercial airliners fly high enough for you not to see their strobe lights blinking, so if you happen to catch a bright object traveling across the sky that doesn’t blink, it’s a good bet you’re looking at the International Space Station. To confirm this, head over to Heavens Above, use the map to get your location coordinates and check the times for ISS passage – mine this morning was from roughly 4:50-4:56am. I checked my clock as it passed over me at 4:54am. I’d say that closes the case 🙂 I waved and shouted “Hi astronauts!!!”
So – great start. We’ll see what the peak days have to offer tomorrow and Saturday morning!
Peak Day One – 8/12
Tomorrow is really the Big Day but this morning is also considered to be part of the peak time to spot Perseids. Unfortunately I was tired from only getting 5 hours sleep after the previous night’s watch and although I got a few hours earlier at night to wake up to watch at 4am, I really couldn’t keep my eyes open. Still, in the 20 minutes I was outside I saw 6 bright meteors flash by overhead and the ISS made another appearance lower in the northeastern sky.
Peak Day Two – 8/13
I slept in the previous day so I could stay up this morning to watch starting around 4:30am – the full moon was still above the horizon tho thankfully at least low enough to be behind my house and tall trees so it didn’t shine on me directly but it still had a noticeable effect on the darkness of the night sky. From the southwest, high-altitude clouds were beginning to move in, which started to haze out the area of sky they covered as they slowly (thankfully) crept northeast. In my first 15 minutes I caught 4 meteors, bright ones obviously since you can’t really see anything else. The first left a nice long streak in the sky behind it. The ISS once again made an appearance, this time pretty much straight up in the sky traveling from the northwest to the southeast. And then…. and then I fell asleep 😛 I woke up about an hour later as the sun rose and headed back inside.
Oh well, haha. Still caught a couple good ones. Hopefully I can make it back out to the mountains again next year.
So since I was on a break from airport development the past few weeks and thus had no new airports to fly to, I decided it was time to go through and check out the many freeware aircraft I had downloaded months ago all at once as I troved various download sites. They had been sitting on my FSX hard drive just taking up space – time to rectify that! I began by figuring out how to install them outside of the main FSX folder. This didn’t present too many problems. First I made sure to add a SimObjectPaths entry to the FSX.cfg file [Main] section that pointed towards the folder on my other hard drive. The second problem I came across was the fact that some of these aircraft use the default FSX sounds and gauges, so I also had to edit their sound.cfg and panel.cfg files. In sound.cfg, I needed to put in the full path of my FSX folder in the alias property. For the panel.cfg, some aircraft were using the “../” method of referencing a folder one level up the tree from the current one, assuming they were to be placed in the default Airplane folder in the FSX install location. So I needed to do a Find-Replace on all instances of “../” to change it to the full path of my FSX Aircraft folder.
Some aircraft just weren’t made for FSX, and many said so explicitly in the documentation but I tried them all anyways just to see. One by one I installed them, tweaked their files if needed and then loaded em up in the sim to see how they looked. Luckily, FSX can handle the addition of aircraft as it runs, since it reloads its database each time the Aircraft Selection window is called up. If the airplane just looked like crap, I deleted it. If it was missing too many gauges on the panel to be functional, I deleted it. If its propeller alpha was messed up and showing the blades as an opaque disc, I deleted it. In the end, I went through all my civilian helicopter and civilian single-prop airplane downloads and wound up with 47 various types of airplanes and helicopters to play around with.
The screenshot gallery above is a conglomeration of various different flights I’ve taken the past few weeks since my last Flight Log entry. I either started at Monmouth Executive, or I departed from an airport I had just arrived at. The first flight was in the Dodosim Bell 206B that saw me departing from Monmouth Executive and flying up to Linden via the Garden State Parkway and Route Linden. It was an uneventful and routine flight, with a touch of hampered visibility and light rain for a few minutes enroute. Landing at Linden proved to be a bit of an exercise as I am still not consistent with my landings being smooth in the Dodosim 206 – sometimes I can nail them other times I’m hovering and futzing about all over the place. This time it was the latter but I managed to get her down in one piece as the darkness grew deeper. But we already know my thoughts on the Dodosim, so let’s get on to some of the new aircraft.
Since I can’t remember where I downloaded most of these files from, I’m hosting some locally if I can’t find them on AVSIM or FlightSim.com. No point in people reading these reviews and then not being able to try them out if they want!
This is pretty sweet, someone took the default FS9 Cessna Skylane and converted it to be fully FSX compatible. Not only that, but they brought over a crapton of different liveries (30 in all!!). My favorite is the one featured in the gallery, which sports a Jolly Roger on the tail. ARRRRRRR!!!! The 3D panel and cockpit are fully functional and there’s also a 2D panel included. Like most freeware craft though, no additional in-cockpit camera views are available and you’ll have to add them yourself. The radio stack is a bit hard to read from my normal .70 zoom level, but the rest of the instruments read clearly and function perfectly. All lights are functional, including the taxi light. The flight model has been tweaked from the default but not having flown the FS9 version I can’t comment on any improvements. However it does handle very well on the ground and in the air. Textures are still FS9-based and have not been upped in resolution for FSX, but they still look good. This aircraft is also set up to work with Shockwave lights. Because it’s a default aircraft in FS9, it comes with a checklist and reference file for the kneeboard.
In this aircraft I departed Monmouth Executive and navigated by dead reckoning and visual flight northwest to Old Bridge. Flying the pattern I slotted myself in between two aircraft, one that had just landed and one that was a few miles out on approach. I came down when that second aircraft was only 2 miles out and hastily exited the runway to clear it for them to land after me.
This is a definite must-have addition to your hangar!
This bird was created by a real 177 owner, who chose to model his actual airplane. It’s a basic model that doesn’t have any fine details to the exterior, but the animations do include cowl flaps and opening doors. The 3D panel is composed mainly of 2D gauges and switch clusters, so it doesn’t look as good as a fully 3D panel but everything is there and everything is functional so that’s really all that matters! Well, almost everything that is – my one beef with this plane’s cockpit is that I can’t find a parking brake indicator anywhere. On a whole, the textures are very “shiny” both inside and out, but not so much so that they are annoying. It’s just something you notice when the camera is at the right angle to the light. Some of the texturing work is pretty nifty tho – the windows for example are textured to recreate the warped-glass view of the bubble cockpit. Just like the radio stack in the 182S, it can be a bit difficult to make out the numbers at .70 zoom. You’ll find all the lights to be implemented properly – something I find most pleasing about a freeware aircraft because not even the default FSX 172 has taxi lights! There is no checklist for the kneeboard, however the author does include a document that details some of the operational procedures of the aircraft and discusses the flight model that has been tweaked to match the real aircraft as closely as possible. One important value he doesn’t mention I had to look up is the Vle, which luckily I found in the POH handbook online although it wasn’t listed anywhere but in the Let-Down checklist. A 2D panel is supplied but the aircraft is designed to be flown from the VC. There is also no pilot model.
I used the Robbinsville VOR to depart from Monmouth Executive and make for Trenton-Robbinsville. Up in the air the aircraft had the usual yaw issues that plague single-engine craft and I was able to rudder trim it stable. Don’t forget to raise the gears! It cruised very well (and very fast!) and in no time I was setting up for a straight-in approach to N87. However despite my calling final on the CTAF a Piper Cub decided to taxi onto the runway and take off anyways. Bastard! I slowed waaay down hoping to give him room to depart but you know these slow-poke Cubs. Took him forever to line up and start rolling down the runway so I had to pour on the power and go around. During my go-around I heard a call on the CTAF of an incoming flight 6 miles out. I can beat that, I thought, only to come around on final right behind the approaching aircraft. I actually flew under him as I made my second go-around. Yeeeesh! Finally I made my final approach clear of traffic and lemme say that this thing glides down so smooth – I’ve never felt such a rock solid descent from another aircraft. However, and the doc that comes with the aircraft does mention this, as you approach over the runway you’ll need to play with the rudder to keep her aligned – I wasn’t able to hold my heading and landed off to the side of the runway (which, ironically, saved me from crashing on a bug in the airport).
Not satisfied with my performance and knowing it was me not the airplane, I departed Trenton-Robbinsville for a dead-reckoning visual flight north to Central Jersey Regional to try my hand at another landing. I got a bit lost on the way since I missed that there were three railroad tracks I was going to cross over and not two, so I looked for the airport too early and ended up backtracking along the Raritan River to finally reach it. A check of the wind told me it was crossing the runway, though at a light 4-5kts. I should have listened to the CTAF longer to see which runway FSX was using for its traffic but I chose the one I thought was closest to upwind and set up my pattern and approach. I still wasn’t listening to the CTAF even though I was tuned in and giving my position, because on final I flew under a plane taking off from the opposite end of the runway. Erm. Oops. At least, this time I managed to keep my nice descent all the way down over the runway now that I knew I needed to work my rudder more to stay aligned properly.
So the exterior and interior modeling aren’t great, but again they are fully functional and the flight model is superb.
Looking for some extra passenger capacity? This craft’s got you covered with 4 seats to the rear – unfortunately things start off a bit disappointing right there because the Payload Settings screen only lets you adjust values for Pilot, Copilot and Baggage. So if you plan to fill those seats and have it affect the flight model I’m afraid you’re out of luck. In terms of modeling, both exterior and interior are well done, if not fully detailed. Textures are also of good quality both inside and out. The virtual cockpit has some character to it in the form of a briefcase and some soda cans in the passenger seat – it would be nice if you could turn them off though to properly simulate an empty seat. 2D panels are provided but as usual the VC is where you want to be. A mixture of 2D and 3D gauges and controls make up the main panel, and the compass is missing completely – there’s not even an entry for it in the panel.cfg file. The radio stack is stretched vertically making the numbers look tall and funny and the smaller ones, like on the DME and Transponder, are harder to read because of it. Since there are no views other than the default, it can be very hard to read the electronic map screen in front of the copilot’s seat. However there are some really cool and unique features of this craft that help make up for its shortcomings. For one the propeller spin mask is very nice – you can see the individual blades spin and the yellow tip outline. The exterior doors animation include the rear passenger scissor doors as well as the main cabin door. Finally, and coolest of all, you can open both the pilot and copilot windows! I love that stuff. But again, there are still some disappointments – for some reason I couldn’t get the engine compartment and sun visors to animate as the documentation says they are able to. Speaking of documentation, it’s all in French/Italian and has lots of pictures that don’t show up. There’s no checklist.
I took the Stationair out from Monmouth Executive on a VFR trip down along the coast of NJ to Eagle’s Nest. It’s pretty much the only convenient way to approach the airport thanks to the restricted airspace nearby. One thing I noticed right off the bat is that it’s very solid handling on the ground taxiing, and you don’t get as much of the delayed steering reaction you’ll find from the default 172, for example. Once airborne it was rock solid once I trimmed up for cruise and coasted down along the shore. Suddenly though I glanced at the RPM gauge, which I don’t notice much as I fly so close to sea level, and saw the needle was a good 200 RPM over redline. I pulled out on the propeller pitch to bring the RPM needle back to the green arc and puzzled over this behavior. I was only flying 1500 feet above sea level, atmospheric pressure was normal and had not noticed similar behavior in the other variable-pitch propeller aircraft I had flown. So this may be a slight error in the flight model.
Well, I haven’t deleted this aircraft from my hangar yet, so that says something. However its various shortcomings do make me less inclined to fly it very often. My main reason to fly this would be the extra cargo capacity when I want to simulate ferrying passengers, but without being able to model that what’s the point? Maybe if the flight model felt more unique…
Alright! Something that’s not a Cessna 😉 Here’s a nicely-modeled Grumman aircraft that amazingly squeezes 4 people into its body – you have to all climb in through the slide-back cockpit canopy (animated) – no doors! Unfortunately the weight and balance modeling does not take into account any extra passengers in the rear, it doesn’t even have a Baggage field. Missing stuff like this really takes a lot of value out of an airplane. The interior of the plane is nicely done, although the gauges on the instrument panel do look a bit large and not very crisp. The radio stack is easy to read though! One cool thing about the gauges is that you can “cage” the attitude indicator, which locks it into place and is used when the gyroscope tumbles during acrobatic maneuvers to return it to its upright position. Unfortunately that’s the extent of the modeling – doing some spins and loops failed to tumble the attitude indicator. But it’s cool so see the functionality added anyways. However one thing that annoys me on this instrument panel is the heading indicator. You can turn the knob but since there’s no “bug” you actually move the heading card and then you have no idea which way you’re going! The magnetic compass appears to display backwards (see my next review for a fix), so unless you have a VOR to tune to and use your CDI gauge to calibrate the heading indicator you’re hosed. Speaking of the CDI, there’s a NAV2 CDI when there is no NAV2 radio on the stack. (I ended up removing it from the panel after realizing this). The Primer knob is interactive, but I’m not sure if it actually does anything since there’s no checklists or documentation included. The fuel tank selection can be confusing as well because the “OFF” panel is also labeled “BOTH”, yet setting the fuel switch to that panel will cut the engine, so it’s obviously not both tanks. I suppose it’s actually supposed to read “BOTH OFF” but if you’ve had a lot of experience with a plane that can cross-feed tanks it’s easy to not see it that way at first. All the lights are implemented, and although taxi lights don’t work at least it’s because this aircraft actually doesn’t have taxi lights! I must say I like how the windows have a “dirty” look to them and the propeller mask is also very well done.
Alright so how does she fly? To test it out I departed from Eagle’s Nest and continued my run down the coast to Ocean City. You can immediately tell you’re dealing with a decently high power to weight ratio by how easy it is to get this bird moving on the ground, and how responsive it is turning about. It’s even more apparent in the air when you lift off and have to apply a good deal of right rudder to prevent the torque of the propeller from putting you into a barrel roll! But as I climbed out and trimmed up I enjoyed the responsiveness of the aircraft – it’s definitely one that inspires you to attempt some acrobatics. Instead, I just cruised serenely along the shore southwards and kept my eye on the DME indicator tuned to the Atlantic City VOR. I was going to DME arc around the Atlantic City Bravo airspace using just the DME. Previously on two occasions I had used the CDI gauge together with the DME to fly my arc, but for a new challenge this time I decided to just use the DME. It’s not that difficult, you just have to adjust your heading to make the speed indicator on your DME register 0kts, which means you’re pacing the station. The only difficulty arises in that you can’t tell if a reading of 8kts means you’re traveling away from the station at 8kts or towards the station at 8kts until you see the distance number tick up or down. So it’s a lot more of a wobbly back and forth path than using the CDI gauge to perform smooth turns around the station. But hey, it got the job done and kept me 13-14nm away from the ACY VOR and outside of Bravo airspace as I cruised at 200 feet above the floor level. I had flight-following activated with KACY as well since I was flying through one of their approach corridors. I arrived at Ocean City with no problems, the plane behaves very well during descent and approach.
Several unfortunate drawbacks diminish this aircraft, but its unique flight model and performance characteristics gives me reason to come back to it every now and again.
This package comes with a model file and a .air file labeled a “B” variant of the AA-5 however none of the included documentation – which isn’t much – tells me if this is really a tweaked flight and visual model or just a re-labeled variant of the previous AA-5A I reviewed. The visual model is definitely tweaked – there are sun visors (un-animated as far as I could figure) added to the cockpit, for example. Flying it though I couldn’t feel any significant difference in the flight model but I will assume it’s been tweaked to match the “B” variant performance characteristics. It retains the same issues I had with the previous model, however this panel came with a proper magnetic compass, so it was a simple matter of copying out that gauge entry and replacing the magnetic compass gauge in the “A” variant’s panel.cfg file. Also this variant is missing a NAV1 CDI gauge, so I had to copy the gauge from the “A” variant over to the “B” variant. Then I deleted the VOR2 indicator in both. Well at least the panels are better now!
To test these wings out, I departed from Ocean City and headed inland, once again arcing around 13nm out from Atlantic City VOR to end up in the general vicinity of Hammonton Municipal. That worked like a charm and other than some traffic flying through the airspace, I hopped in the pattern and landed without any trouble. Again, I could not discern a noticeable difference in the flight model between this and the “A” variant.
If you’re going to try either of these planes, best to get them both so at least you can swap the gauges!
TO THE CHOPPAS!!! Enough of this boring fixed-wing nonsense, let’s check out some heliboppers. And not just any helicopters, but retractable gear choppers. Yes. They are so sexy. There, I said it. Skids are cool and all, but retractable gear is where it’s at. We start with an excellent GMAX model of the Bell 430, which does indeed look rather superb from the outside – the model itself is very smooth and streamlined, especially the exhaust ports, and the textures are well done. The rotor masks are also very nice-looking… but if you down through them you’ll see that they erase ground objects and textures, and the shadow they cast is a blocky texture. Given that this model was made for FSX, it’s a bit disappointing. Moving inside, things aren’t much better. The textures are very low-res, so much so that in some cases you see them stretching across polygons. The instrument panel gauges are not all very crisp, and the ADF guage comes up blank – I had to replace it with the default Bell 206B gauge, which worked okay. Again, thanks to there only being one VC view it’s practically impossible to read the DME gauge all the way over on the copilot’s side. The ADF select numbers are barely readable even when you zoom in. There’s also a gap between the panel and the covering on both corners exposing a little bit of forward view, enough to be annoying and too little to be helpful. A plus though is that you get a basic checklist and performance figures for your kneeboard, and there are a lot of decent liveries for this aircraft from civilian to law enforcement to medical. You can also have some models with skids. In what is sadly a common trend amongst these freeware models, weight and balance is once again ignored, and you can only set the weight for “Station 1”, which I assume is the pilot.
I flew this from Hammonton up to Princeton, and from the Wall Street Heliport around NY harbor in the Port Authority livery to land on the One Police Plaza helipad. The flight to Princeton was done at night so I got to check out the night lighting capabilities and the helicopter was well-equipped with switches for Nav, Beacon, Landing and Panel lights. Turning on panel lights had a strange effect of dimming the external nav lights, but that wasn’t a huge deal. The landing light, however, was not well-implemented – at least for me. Maybe it’s how I have FSX set up or the addition of REX textures but the landing light did not illuminate the ground at all and you could barely see it underneath the helicopter. I’m guessing this isn’t only my problem since someone went and added in Shockwave lights support for this model. Flight dynamics-wise, it’s definitely a different helicopter if you’re used to flying something like the Bell 206. The most noticeable difference is that it turns differently, you can’t bank hard like the 206 without sinking a lot in the process unless you add some power. You’ll also find as you pull back to stop from sinking the helicopter will want to slow to a hover. Speaking of power, for some reason the torque gauge registers 80% torque when my Saitek X52 throttle is at 50% thrust. If I open the throttle fully the torque needle will go all the way to 120. Reminds me of the Stationair’s weird RPM overspeed issue and makes me a bit uncertain of the quality of the flight dynamics.
It’s got issues, and the flight model may possibly be flawed, but it will challenge you in new ways as it handles differently than a stock helicopter and you’ll have to get used to setting up a nice long approach when it comes to landing because there is not much floor visibility once you’re over the pad so you want to see it the whole approach.
The “L” variant of the 206 is, as its name suggests, for “Long” and that’s a literal interpretation of the variant as it is 30 inches longer than a regular 206. The model is very good looking externally, and there are a decent amount of varieties with the model itself – like having no doors, a camera for a news chopper, a searchlight for a police chopper, floats for a Coast Guard chopper, etc. Unfortunately things like the searchlight are not operable, and in fact the landing light does not exist at all although beacon and navigation lights are there, as is panel lighting. However unless you have these mapped to a joystick or key you’re going to have trouble turning them on since with the exception of the main panel and radio stack the interior cockpit just has flat textures for some control panels that offer no interactivity at all and in some cases are badly stretched over the polygon surface. The rotor mask is better than the 430 in that it doesn’t alter the appearance of object textures, but it still casts an unwanted shadow on the ground beneath the helicopter. There are no checklists or reference speeds included. A 2D panel is included, but there are no extra cockpit views. Again, we have a model with extra cargo capacity, and the weight and balance modeling has no support for it at all, only offering up weight loadouts for “Station 1” and “Station 2” which I assume equate to the copilot and pilot, respectively. Bah!
I took this chopper from the pad at One Police Plaza back to Wall Street heliport, buzzing around the city on patrol as I did so. It handles, unsurprisingly, much like the default Bell 206B. The only thing you need to remember is that if you’re ever in a tightly-confined landing zone that you have an extra 30 inches to make room for. Since it basically uses the default Bell 206B panel as well, all the instruments are readable and functional, although you’ll notice that bad texture stretching at the bottom of the radio stack. Actually I think that stretches the Transponder tuner out of sight. Bummer, luckily FSX ATC largely handles that for you anyways! Yea but still…
There’s not much special here, and the lack of weight and balance modeling annoys me, but the thing that makes this aircraft stand out most are the variety of visual models that will add some more role-playing opportunities for you in the sim. Quick, a car chase downtown – hop in the news chopper and get that on Tee Vee!!
I had intended to review this after flying it but upon searching for the download file I came across a much newer version than the one it seems I currently have installed right now. So you can check out the pictures but I’m going to hold off on my review until I can try the new model, as it sounds from the description alone like it fixes some of the problems I have with this one.
Oh dear, I just spent the majority of the day compiling this entry instead of working on KMIV. Sorry MSEA folks! 😉 Will get back to work on that tomorrow… better update the schedule…
Time to start sharing some of my airport development experience and I might as well start with this topic as it came up in a thread on FSDeveloper. This tutorial will cover several things:
Creating rows of parking tees like actual airport parking areas
Using ADE guidelines
Preventing AI spawning in certain parking locations
Placing static aircraft and communicating taken parking locations to the user
Recognizing limitations of this method
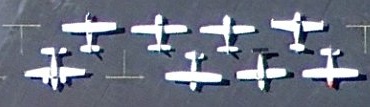
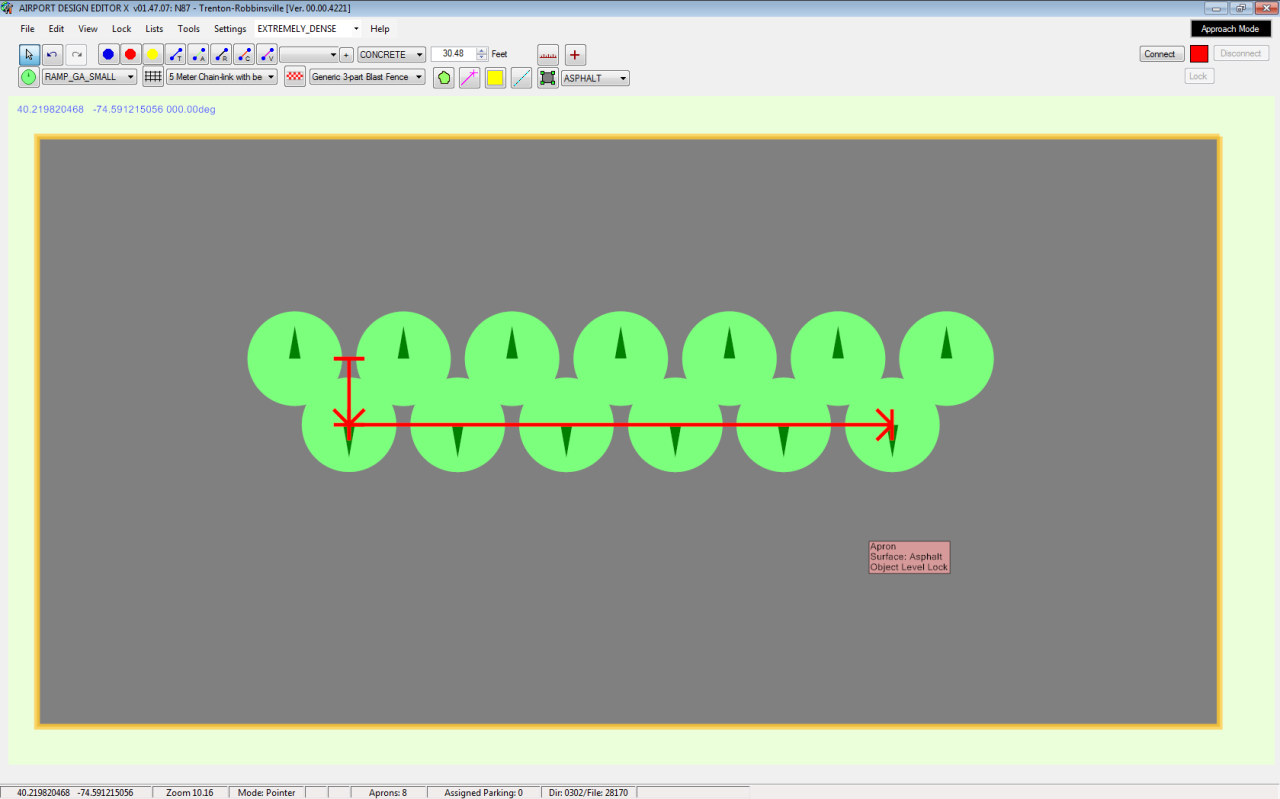
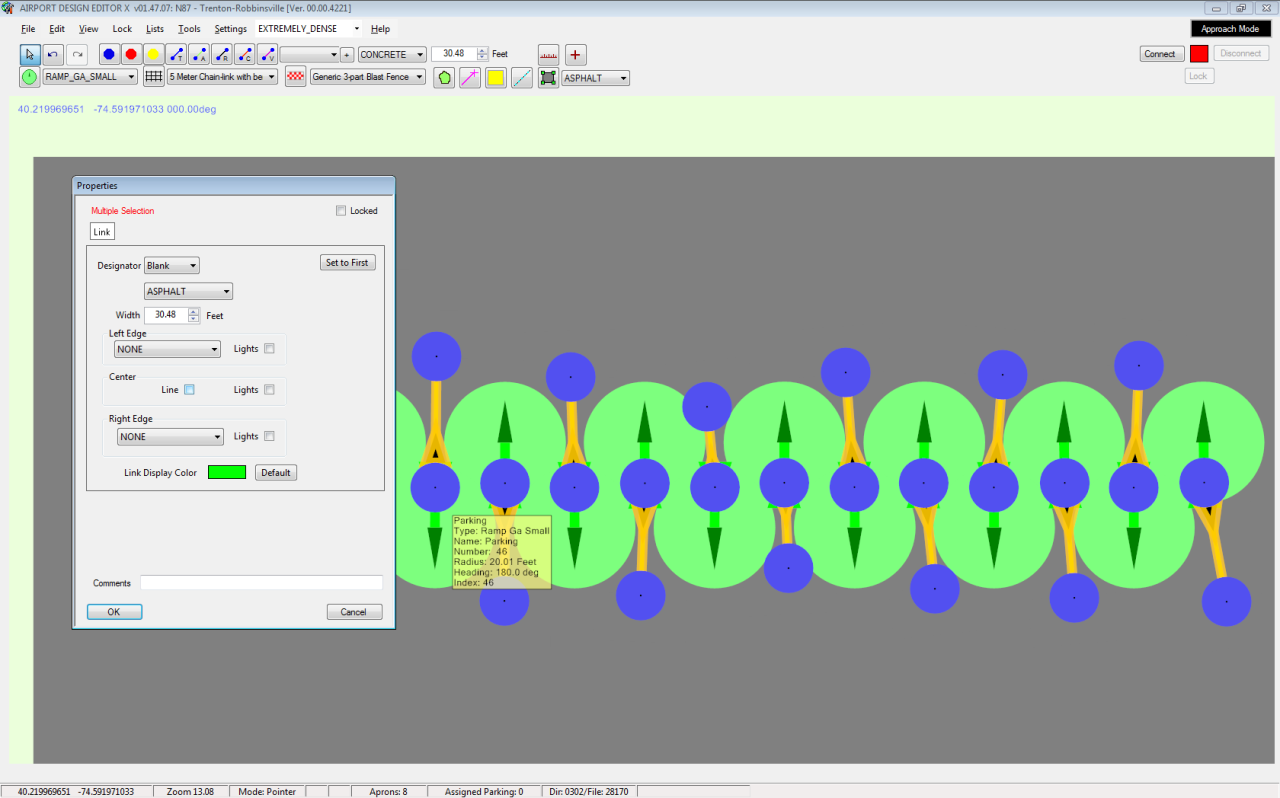
Let’s dig right into it. The main focus here is to create parking as depicted in this image:
Creating the basic parking stalls
You can see that aircraft are backed into their parking locations and are jigsawed together to fit as many as possible into a given area. These aircraft are generally positioned as such after they have been taxied near to the parking location and shut down, being rolled back by their owners. To recreate this in FSX, open up Airport Design Editor and follow along:
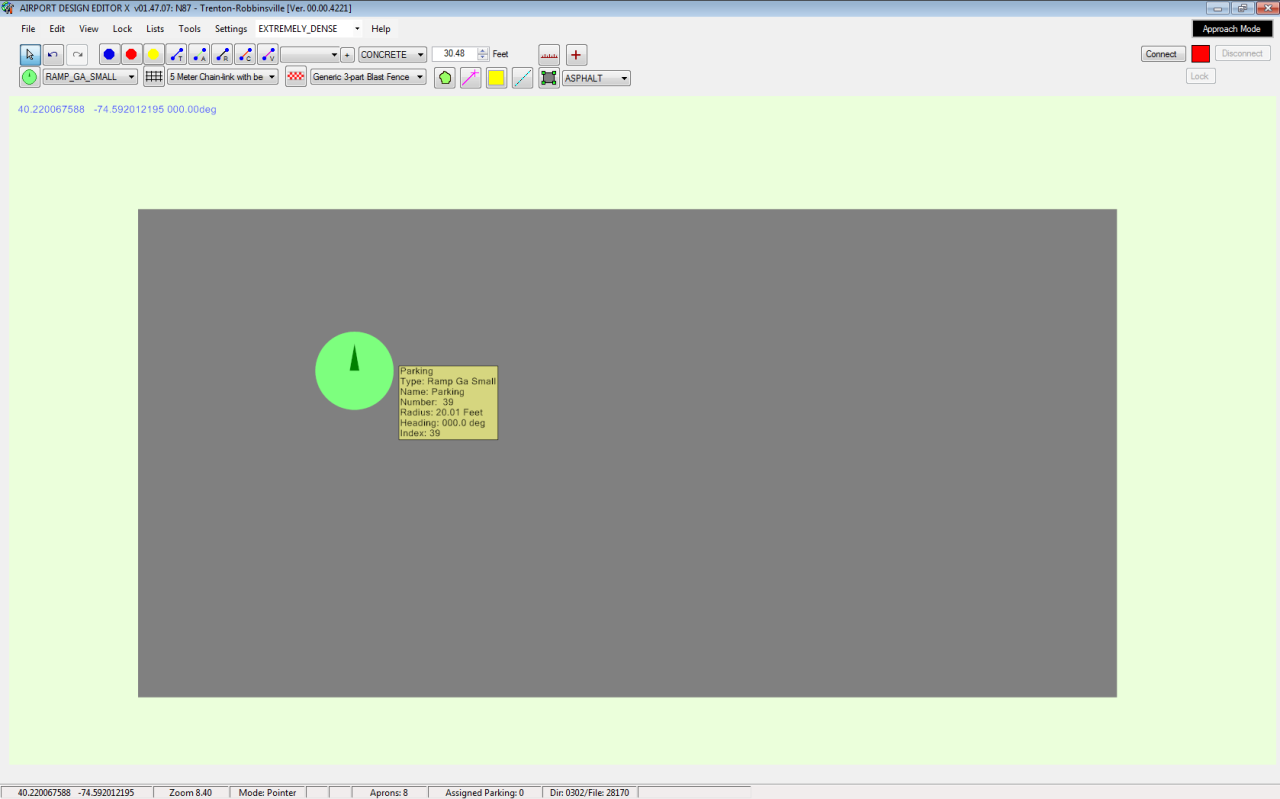
We’re going to start with a single parking location. Nothing fancy, just select the default RAMP_GA_SMALL parking stall and plop one down on your tarmac area. Align it whichever way is proper for your parking arrangement and then open up its Properties window. In the upper-right, select the Locked check box. In the Radius box, change the width to 20 feet (If your ADE settings are in meters, you’ll have to adjust your measurements accordingly). In these parking arrangements, you commonly won’t find room for any aircraft with wingspans much larger than 40 feet. Close the window.
Next, select the Guideline tool and draw yourself a line +90° from the heading of your parking spot. Use the Properties window to make the Heading of the guideline exact if needed. Airports can have slightly varying amounts of space between their parking tees, so be aware of this. For our tutorial though we’ll space these tees 46 feet apart – which is pretty much the common spacing in my experience so far. In the Properties window of the guideline, set its Length to 46 feet.
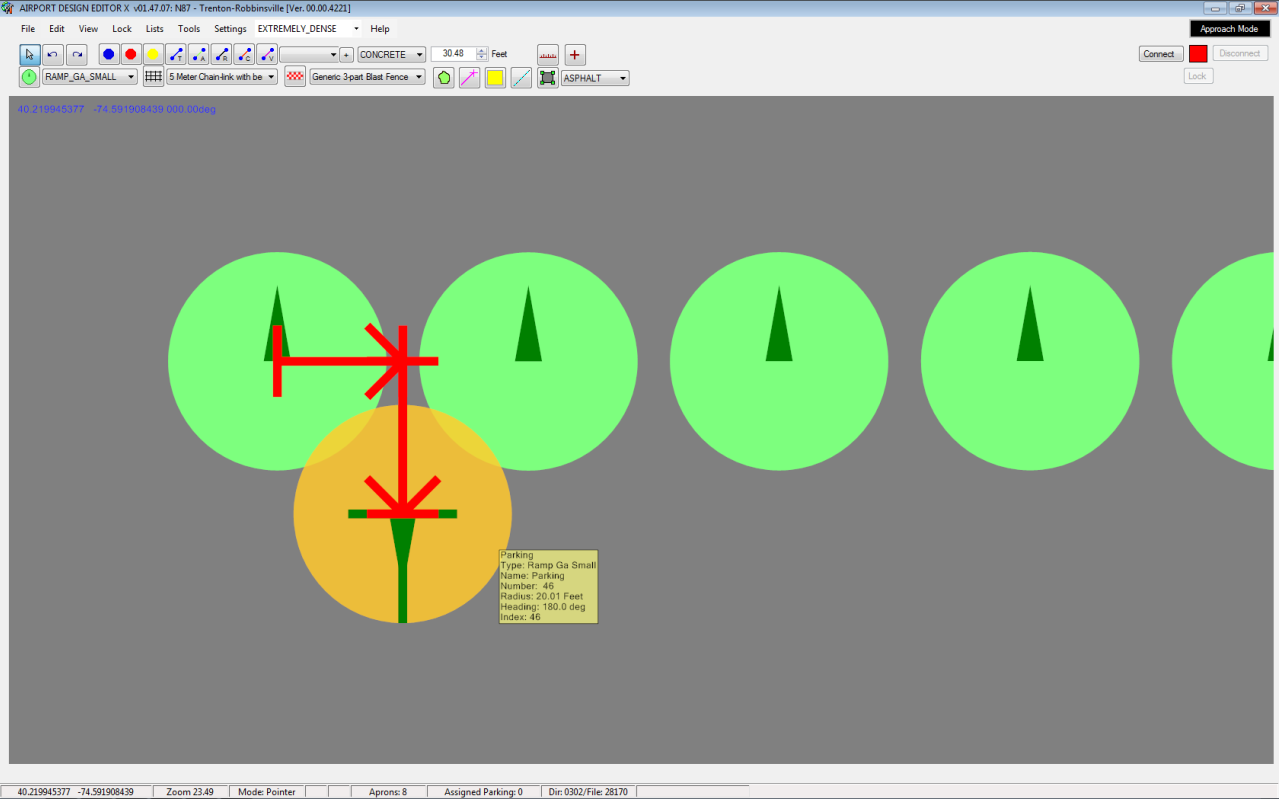
Now select your locked parking spot and Copy it. With the locked parking spot still selected, press the Delete key. Nothing will happen of course, because the object is locked and immune to deletion, but you’ll find that this object will remain selected even while you’re fiddling with other airport elements. (This little trick works with other airport elements too like Aprons and Objects – experiment!). We’re going to use this to align our guideline. Grab it with your mouse and drag it over so the flat end of it aligns with the center cross on your still-selected parking space. Zoom way in for finer movement so you can place it perfectly. Now place your mouse cursor on the head of the arrow (the pointy part) and Paste to plop down a replica of your first parking spot (thankfully ADE does the job of incrementing the parking spot number for you!). It may be a bit off-center – no worries just unlock it and drag it to align with the end of the guideline.
Now click on your still-highlighted parking spot and then click off it anywhere else on the screen and it will deselect. Your screen should now look like this (I left my parking spot selected so you could see the alignment of the guideline):
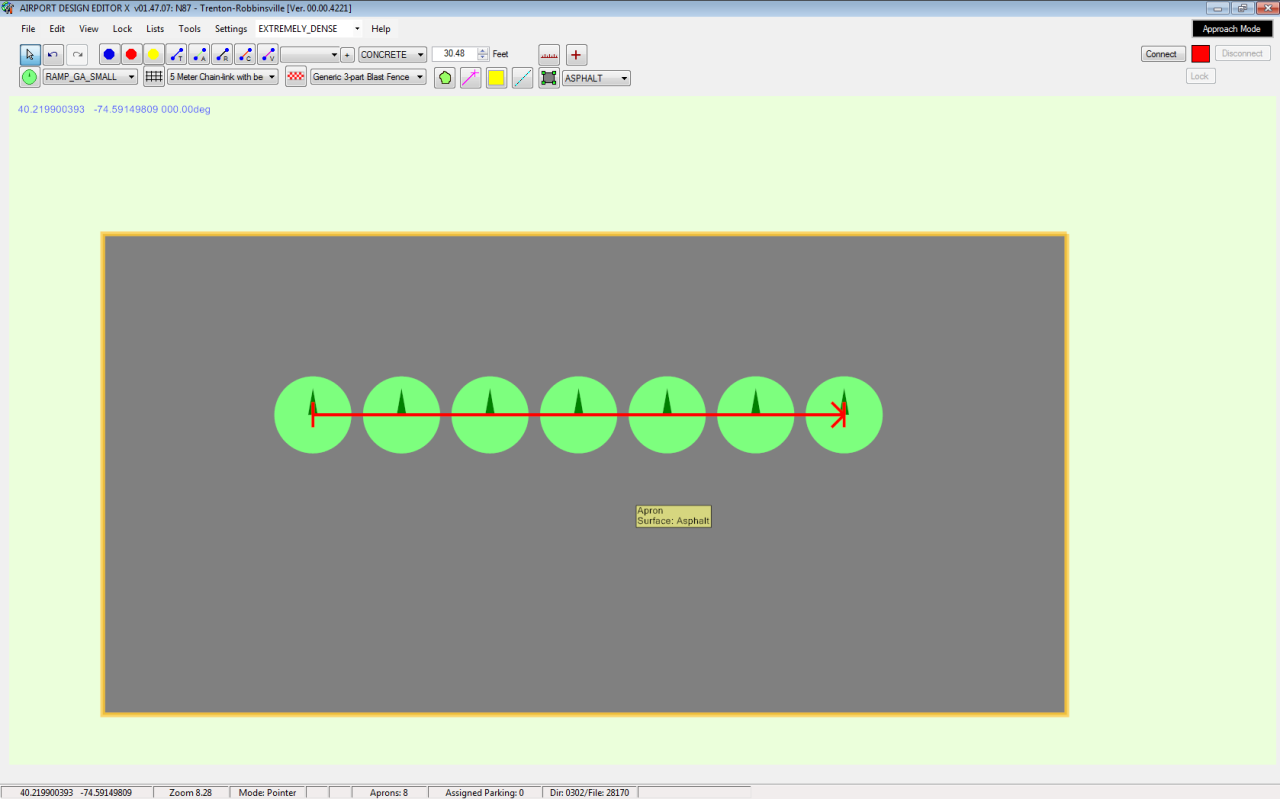
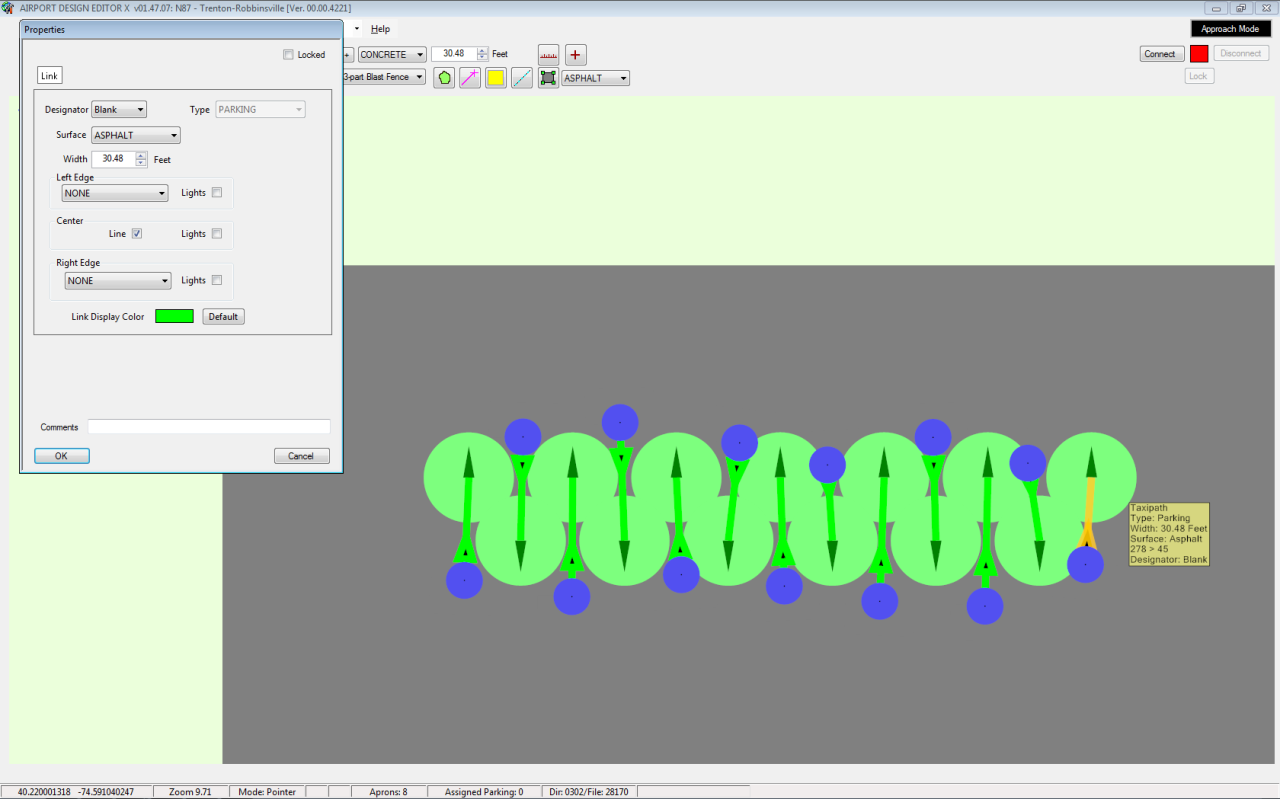
Now let’s move on down the line and create 5 more parking locations. To do this we simply first open the Properties window of the guideline and double its Length – 92, 138, 184, 230, 276. After each extension of the guideline we Paste another parking spot. If you pay attention to where you place your cursor on the arrow when you paste, you can get the hang of plopping them down without needing to align them afterwards. You don’t need exact alignment. A few inches won’t hurt anything. After you’re done you’ll have a nice even row of parking spots:
Sweet! Okay now let’s handle the bottom row of parking. First, we need to locate the midway point between our parking spots. What’s half of 46? Open your guideline’s Properties window and change its Length to 23 feet. Now create a second guideline, set its Heading to be +180° from the heading of your parking spots and its Length should be 28 feet (again, this distance can vary slightly, but unless you’re looking for an exact match based on satellite textures, this is a good distance for general use). Now align the base of the second guideline so it forms a cross with the arrow end of the first. Paste another parking spot at the arrow of the second guideline and rotate that spot to align with the heading of the second guideline. You now have the first parking spot on the bottom row:
Now move your first guideline down to align with the bottom row of parking – you can either use the lock and delete trick with the first bottom spot or just align the guidelines themselves. Extend the Length of your first guideline back to 46 feet, Copy the bottom row spot to preserve the heading and begin the process of Pasting 5 more parking spots in this row just like you did for the top row. In the end it will look like this:
All right! Now it’s time to create the Tees themselves, which is a default texture created by FSX whenever you attach a Path to the parking spot that has a Line enabled. Conveniently (in this case) ADE automatically enables the Line attribute to all Paths connecting a parking spot. Most commonly, you’ll be using an Apron Path to connect to parking spots, so select the Apron Link tool from the toolbar and connect Paths to all your parking locations. Because the bottom of parking Tees orient towards the Path and not the heading of the parking spot, make sure they all come out on the opposite heading of the parking spot, so the broad top of our Tee is facing in the same direction:
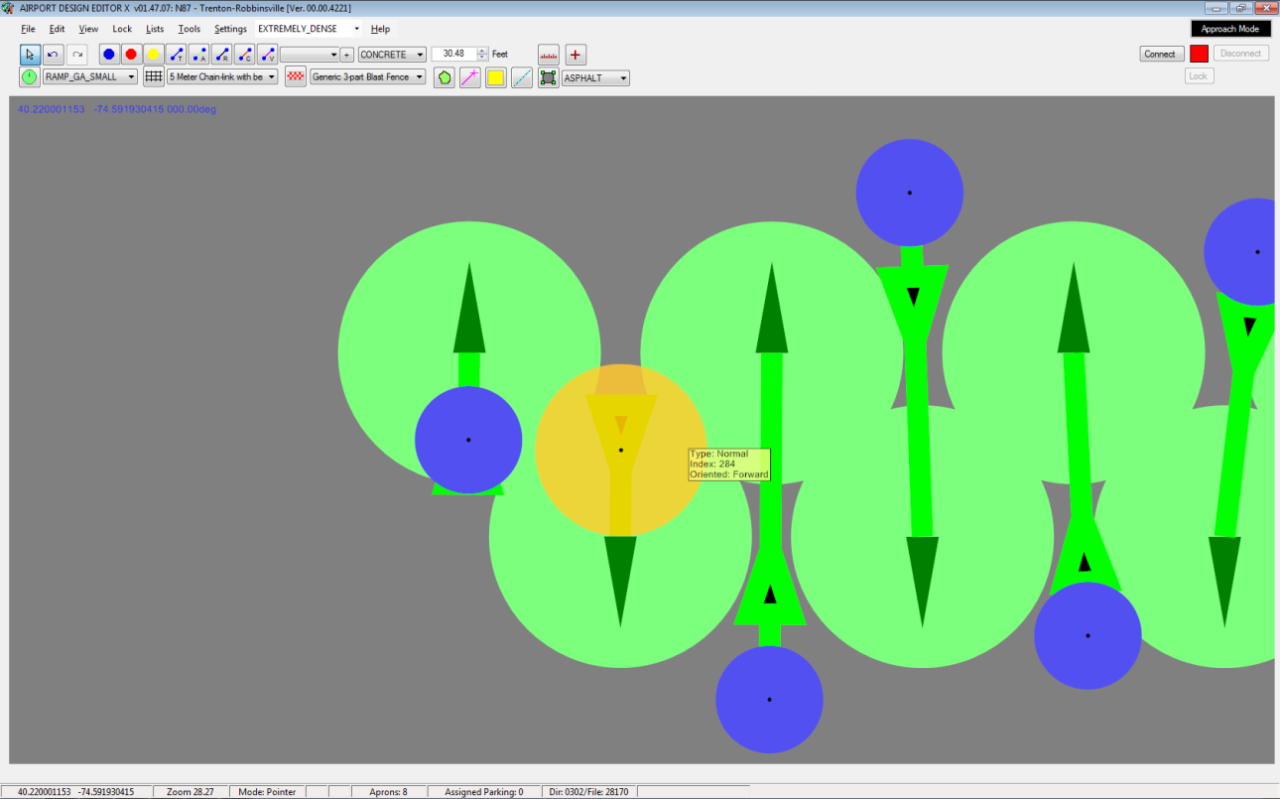
Opening the Properties window for any of the Paths you’ll see the Line property is checked. You’ll notice I kind of placed the Paths a bit haphazardly – that’s because we need to fine-tune their placement anyways in this next step. Grab a Node with your mouse cursor and drag it over the parking spot it’s attached to until the enlarged edge of the Node just touches the bottom of the triangle within the parking spot, making sure the Path is a well-aligned as possible opposite the parking spot’s heading. Seeing this in action is best so look below to see an already-placed Node (left) and a selected Node (right) in the process of being placed:
The length of the lines extending out from the bottom of a Tee are directly related to the length of the Paths coming off of a parking spot. Placing our Nodes this close to the center of the parking spot means that the line will be so short it won’t even render and we’ll see just the Tee parking texture, assuring a consistent size. Continue to align the Nodes all the way down the row of parking spots.
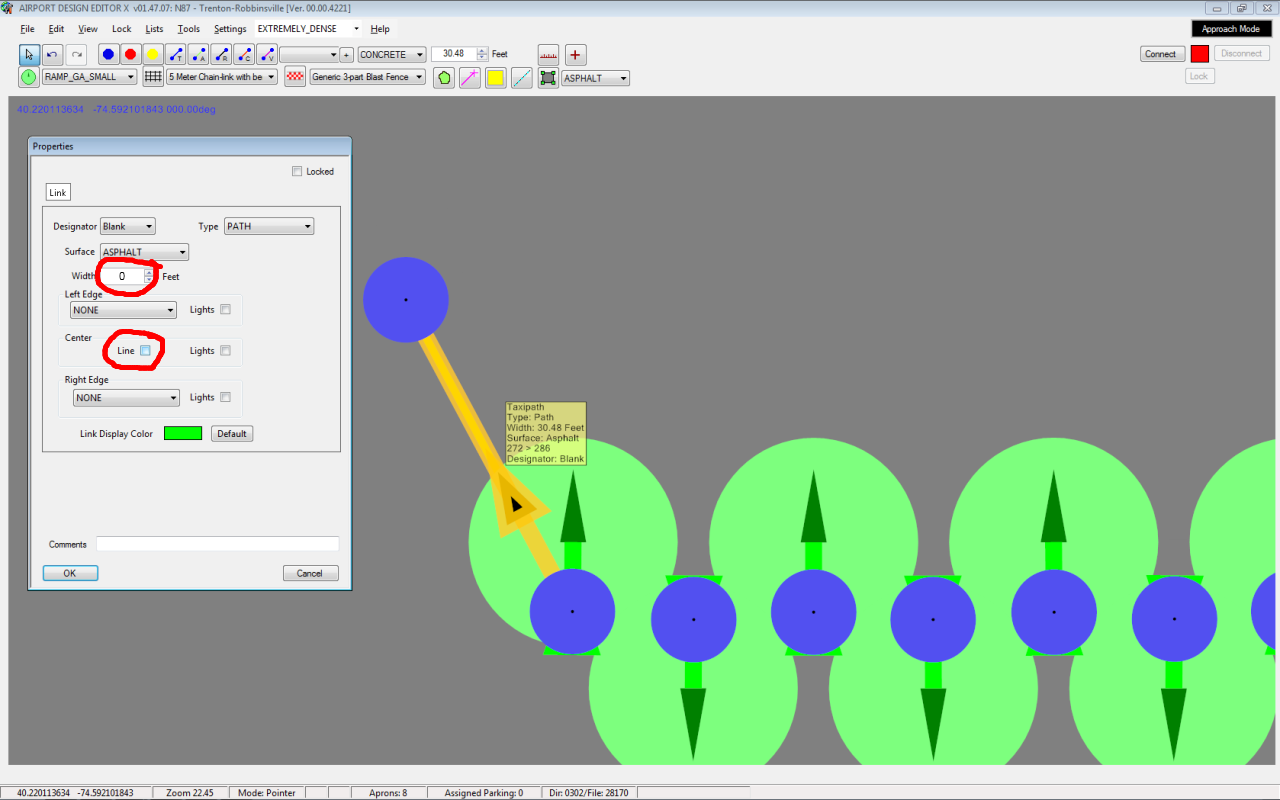
Now we come up against some problems: 1) our AI aircraft are starting in this parking spots facing away from the Path. We want them to depart straight out from the parking spot, not turn around. 2) we don’t want any taxi lines showing on the ground.
To solve these problems, we need to create a second Node with a Path we can set to not display a taxi line. That way, the Tee texture will be drawn, but the rest of the Path will be invisible to the end user. Make sure that in addition to turning off the Line property of the Path you set the Width to 0 feet to ensure that the line terminates at the node and does not bend to follow the Path away from the parking spot:
When you do the other parking spots, it’s best to tackle their second Nodes all at together so you can use the multi-select feature of ADE to turn off their Lines all at once:
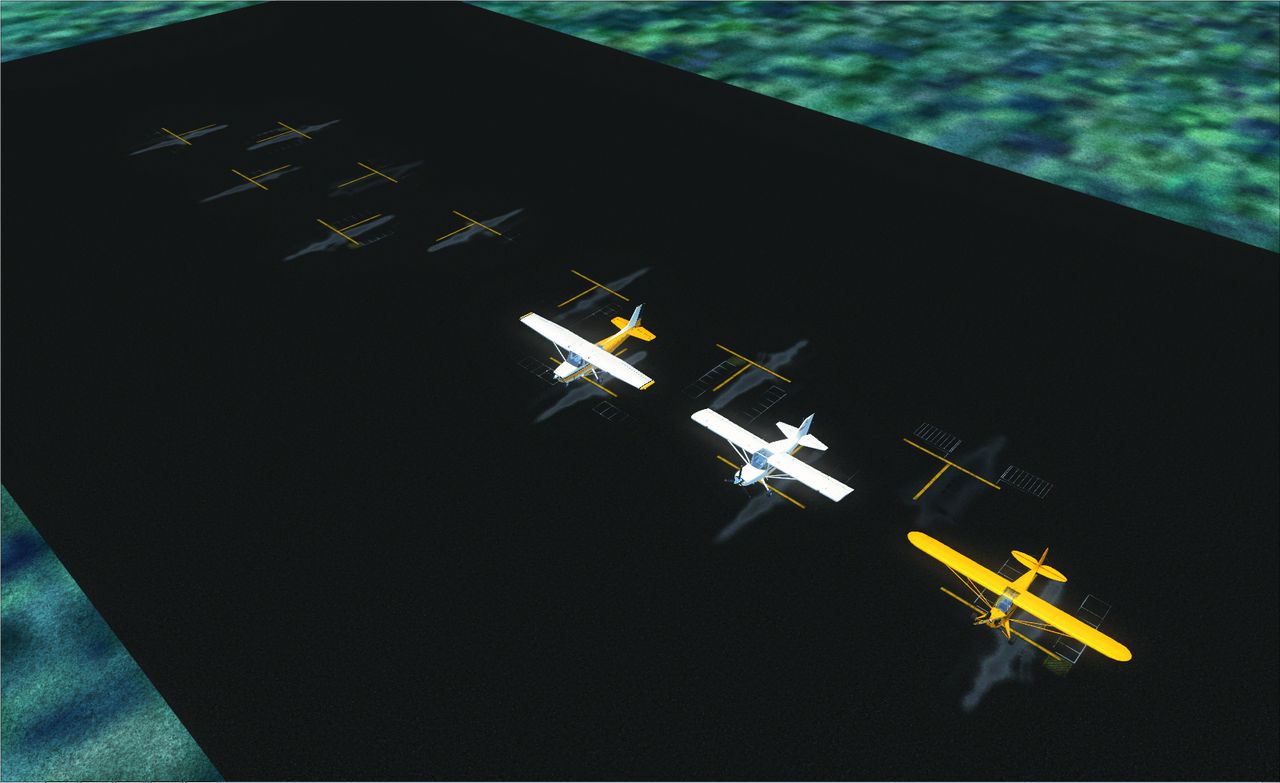
And we’re done!! Compile it out and load up FSX to see the results of your handiwork:
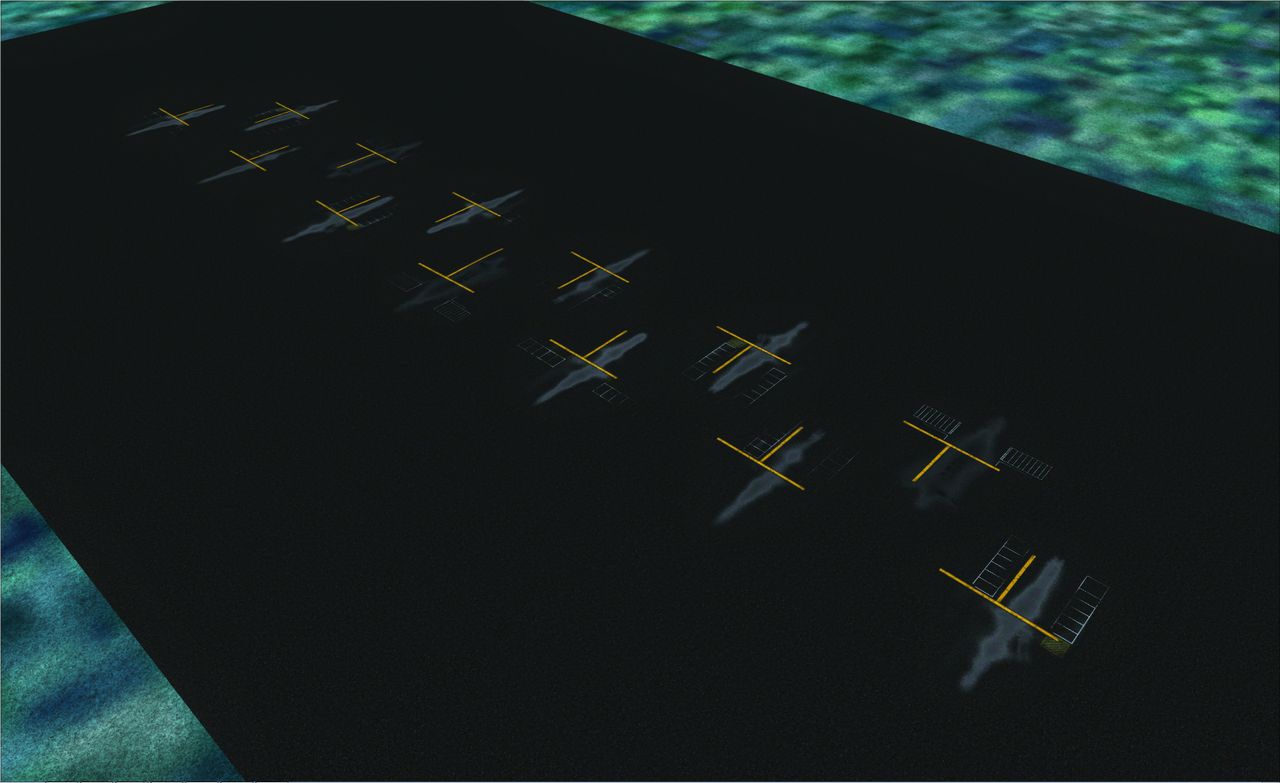
Ut oh 🙁 What happened? We seem to be missing a parking Tee. Luckily this is a common problem that is easily solved. Identify the parking spot(s) that is missing and slightly tweak the position of the Node attached to the parking spot to either side of center. Recompile and you should be good to go:
Restricting AI spawning
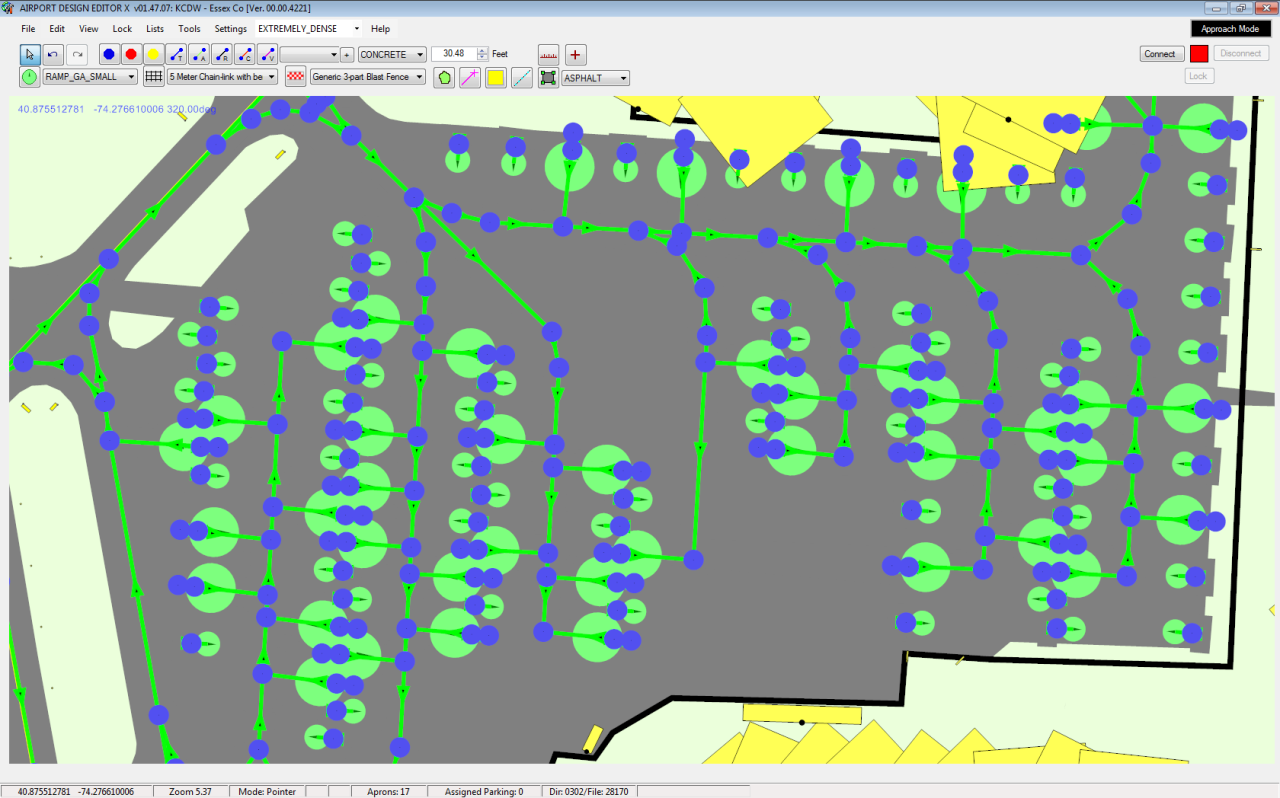
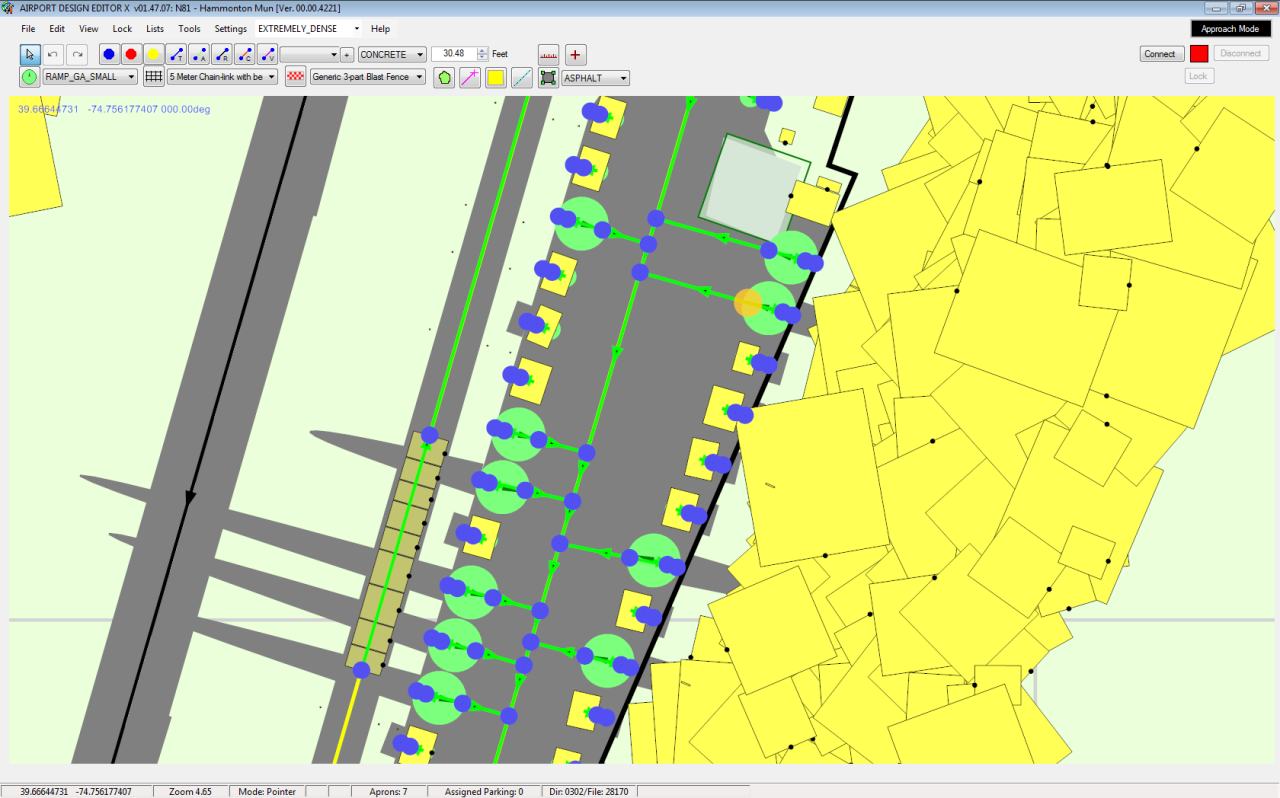
Now let’s get a little fancy. These parking setups, as they are arranged at some airports, can be quite compact. And numerous. You can have one row of stalls set up right across from another row that’s across from another row… when you start laying down AI paths it can all get a bit overwhelming. And why should you need all the parking spots for AI to spawn in? Anyone who runs enough AI to fill all the spots in the figure below, for example, would need a super computer!
Hopefully that didn’t explode your brain. I removed a lot of elements to help make things clearer. What you see above is an accurate rendition of some of the parking at KCDW in NJ. (which appears to have recently been expanded!)
So what’s going on in the image above? You’ll notice some of the parking spaces are smaller than the rest. One of the reasons for this is to help reduce clutter in the AI Paths that could result from attempting to connect every single parking space to the Path network. Instead, given the fact that there are more than enough spaces to handle any sane amount of AI, I reduced the radius of the majority of parking spaces down to 10 feet. Because of the way FSX works, AI aircraft will not park or spawn in a parking space that has a diameter smaller than their wingspan. I mean, makes sense right? Now how many planes do you know of that have wingspans less than 20 feet? Even the default FSX Aircreaton Trike has a 33 foot wingspan. So you’re effectively creating parking spots that no AI craft will use. Well wait then why bother have the parking spots at all? Remember that we need them to draw the Tees for us. Fortunately, the size of a parking Tee is constant and reducing the Radius of a parking space will not in turn reduce the size of the parking Tee. You’ll also notice that the reduced parking spots only require a single Node to draw the Tee. Reducing the Radius of parking spots does not prevent the player from choosing them either.
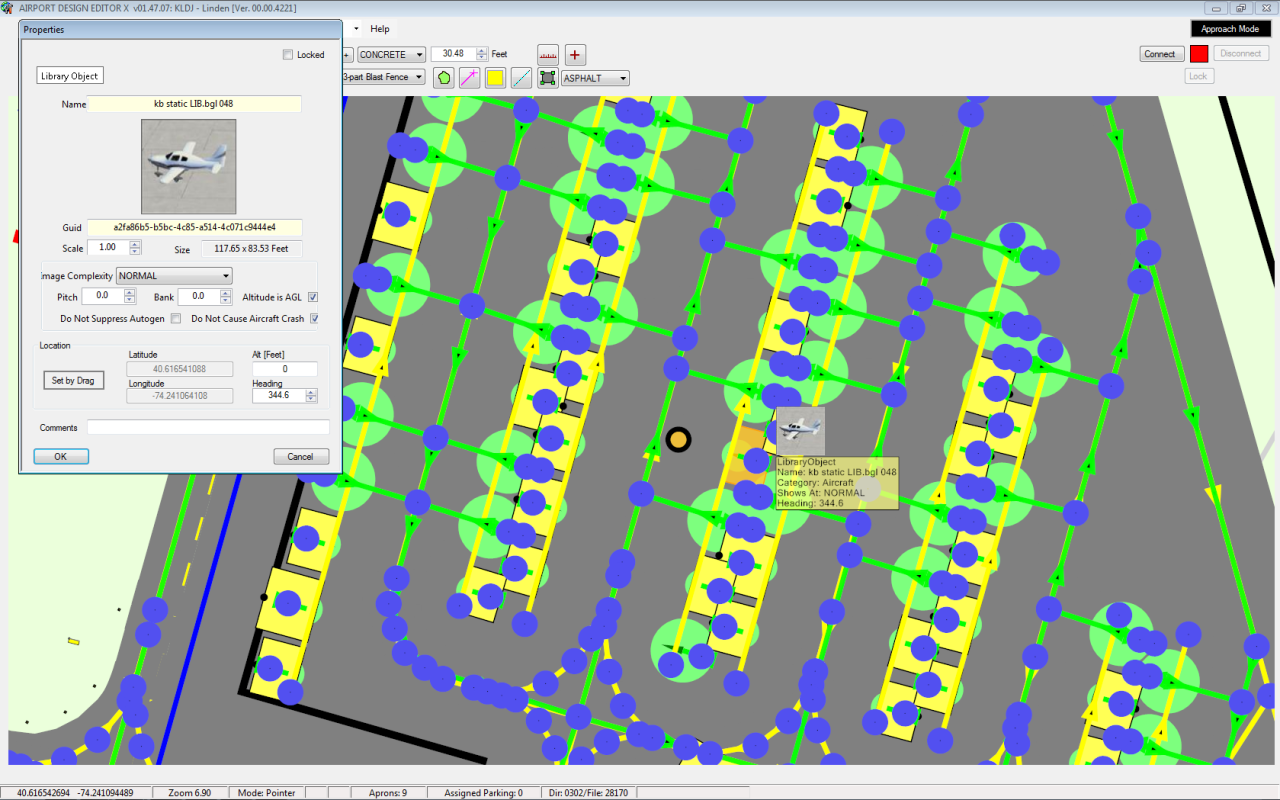
Using static aircraft
Okay let’s take things one step further. So we have a crapton of parking Tees now – it would look a bit desolate if only a few AI craft took up residence on them. There are a ton of static aircraft libraries out there… sorry, correction – there are a few static aircraft libraries out there that contain a ton of various aircraft you can place on the smaller parking spots to fill in your scenery and make it look more like a real airport. Problem: How do you let the user know that a space is occupied by a static aircraft? As mentioned earlier, the user can still choose any parking space to start in – any AI aircraft will load after the user but any static aircraft will load before the user. To help prevent a user from starting inside another airplane (I hear that doesn’t end well) we can use the Type field in the parking spot’s Properties – I like to use the generic RAMP_GA designator to denote parking spots occupied/blocked by static aircraft/objects, while using the RAMP_GA_SMALL designator to tell the user the parking spot is open for small aircraft. Of course this doesn’t mean the user can’t start inside a static aircraft, but if you place this information in the ReadMe there’s a good chance the user will see it. To be on the safe side, I always check the Do Not Cause Aircraft Crash box in the object’s Properties. Just in case!
Above you have an example of a ton of static aircraft taking up residence at KLDJ, as you’d find at the actual airport (looks like they recently repaved this section…). Here’s what it looks like ingame::
Known Limitations
So this all looks pretty damn good right? Well, as with anything there are some tradeoffs you’ll have to deal with.
The biggest thing is that while AI craft can start fine in these parking spots, they don’t do a very good job of returning to them. Generally what happens is they come close to the parking spot they want to end up in, turn slightly off the taxi line, and then just shut down and block the taxiway. Now, as mentioned at the beginning of this article, that’s generally what real pilots do anyways, so really you’re adding a bit of realism to the sim with this method. However it can cause some problems in that other AI won’t yield to a parked aircraft, which means they will just taxi right through it like it’s not even there. Not a big deal in my book but it’s something to be aware of. The AI will shut down within close proximity to whatever Node is closest to the parking attached Node. In most cases this will be the Node that’s connected to the AI Path network. However in some cases this doesn’t need to be so:
The main AI Path is the green line running down between all the parking spots. The highlighted Node is now the one closest to the parking Node and will draw the AI off the main taxipath to shut down out of the way. If this Node were removed, the AI craft would turn slightly off and shut down along the main AI Path instead. So this behavior can be controlled if you have the room.
Another small thing to note is that AI craft still push back slightly when they first start – so if they are parked in a row of stalls surrounded by static aircraft they will back up slightly through those aircraft before pulling straight out and taxiing onward. If it happens to be a user sitting there going through his pre-flight… Yea. Again minor issue and a rare occurrence if you have lots of parking, but something to communicate to the user in the ReadMe so they can watch out for it.
It’s also worth mentioning that you can create your own ground polygon parking Tee texture that you can place however you wish – or even a single polygon textured with multiple Tees. I personally don’t bother with that stuff and stick to whatever the sim provides me. But that’s definitely an avenue that grants you more freedom. I’m unsure what the performance penalty, if any, would be however. One thing I like about default textures is you know they are optimized to work in the game as best as possible.
Finally, it should be mentioned that this method has not been tested in FS9. If anyone tries it in FS9 let me know how it goes!
Conclusion
And that’s pretty much it 🙂 I’ve been using this technique for several airports now after perfecting it with KCDW and it’s added a boatload of realism to the look and layout of the airports. I am able to match parking layouts exactly and still retain functionality with the AI. It definitely requires more work to get set up and lay out but in my opinion it’s worth it if you’re someone like me who likes it As Real As It Gets.