Okay first of all I don’t know if I’m going to be blogging every day. I might, I might not. We’ll see. Regardless I will be re-capping everything since the last time I blogged.
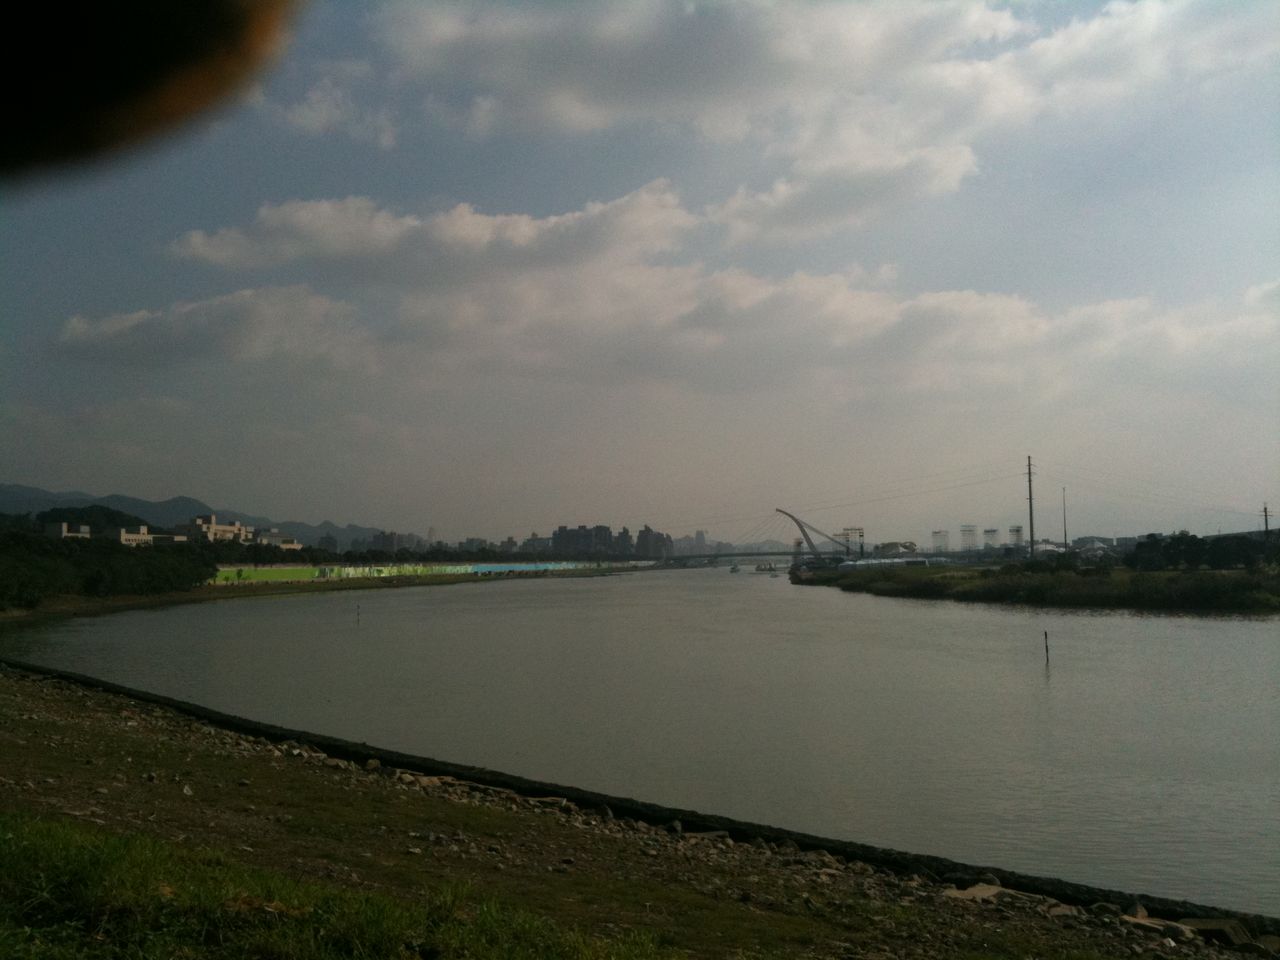
So since we are waiting for some product to arrive (customs is a bitch) today starting at 7:30am we all lent a hand over at the Danshui River site, which is the program that will be playing earlier in the night for the Floral Expo. This is a huge site that racetracks around the river and today was spent out in the field hanging panels on racks and running wire here and there that will later be used to tie in the actual fireworks. To give you an idea of the scope, here are two photos:
The first one was taken at the staging area, where the large tent is set up that houses all the firing equipment. You can see the floral expo on the left. The second was taken at the far end of the river bend you see in the first photo looking back to the staging area and the bridge it is under. This entire distance contains fireworks spaced at intervals. It’s a long walk but we have 2 bicycles and a small flatbed trucks that makes rounds to ferry people where they need to go. But the riverside isn’t the whole program. Check out the satellite view – we’ll be crossing the river using small barges and then there will be trucks lined up along Highway 1 and the bridge to form a complete oval loop that will be shooting up fireworks like they are on a racetrack.
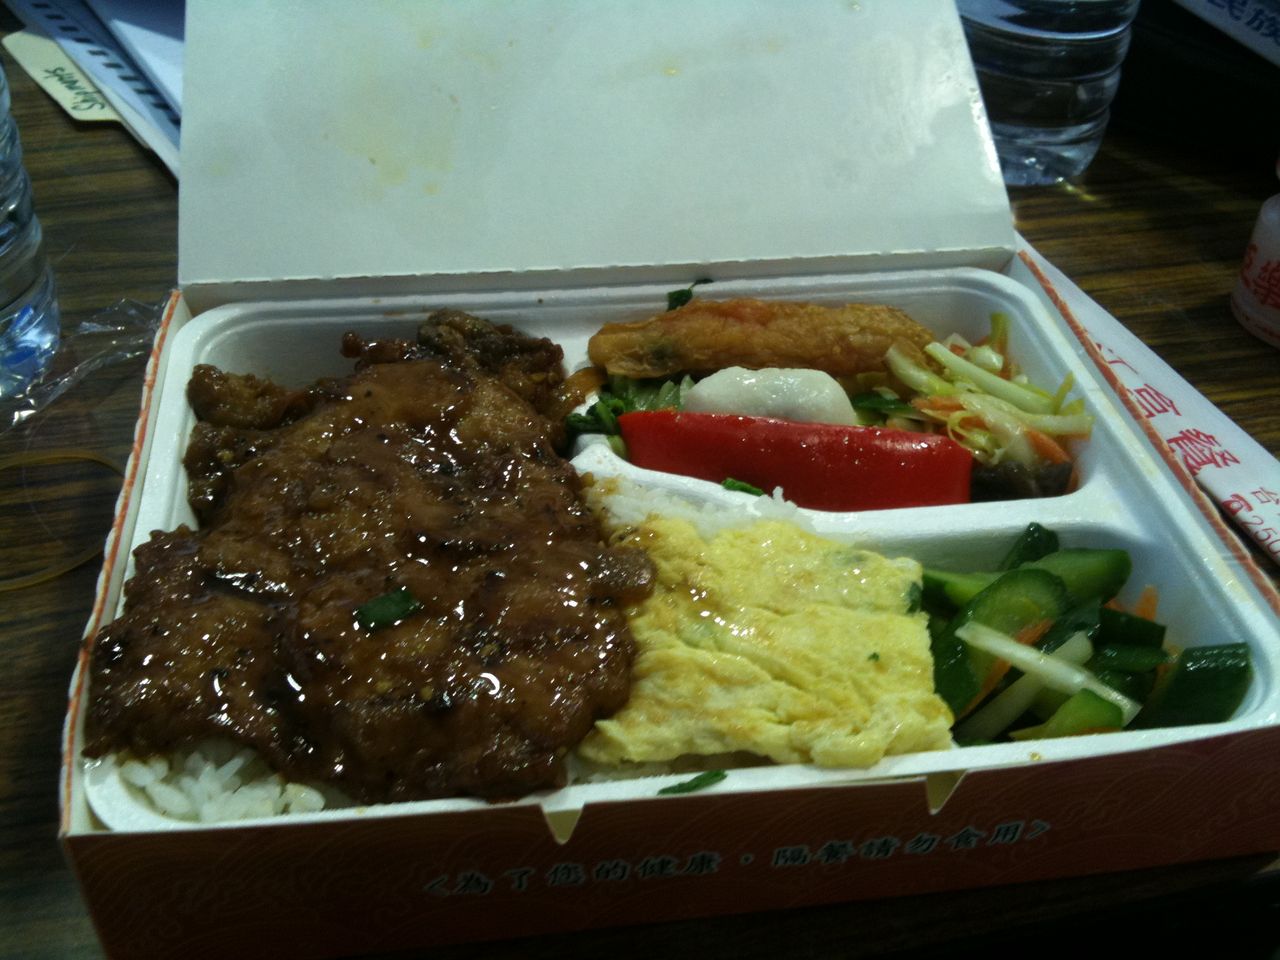
We had lunch at the staging tent, white rice with egg and pork, assorted vegetables and other stuff I didn’t know – some tasty some not 🙂 The weather was great today, partly cloudy with the temperature somewhere in the high 50’s/low 60’s. Windy – when the sun went behind clouds and the wind was blowing you chilled out quick. But we were all moving around enough to stay warm. Besides hanging panels and running wire I also spent some time on the bicycle running some courier errands between the various people on the field and the staging area. One time pedaling back the flatbed pulled past me and I grabbed on to the side railing and let it pull me along – I was Marty McFly – but on a bicycle instead of a skateboard. I also took the measuring wheel up onto the bridge with another pyrotech and we measured out distances to place racks for later on in the setup process. Here’s a shot from the bridge:
We wrapped up and headed back to the hotel at 5 – although some stayed behind to sort the first shipment of product that finally arrived around that time. Me? I’m beat. All the walking/biking – and my fingers are feeling a little raw from stripping and twisting and running all that wire. I’ve got some work to do on the computer and then it’s time to lie down and pass out – another early start to the day tomorrow.
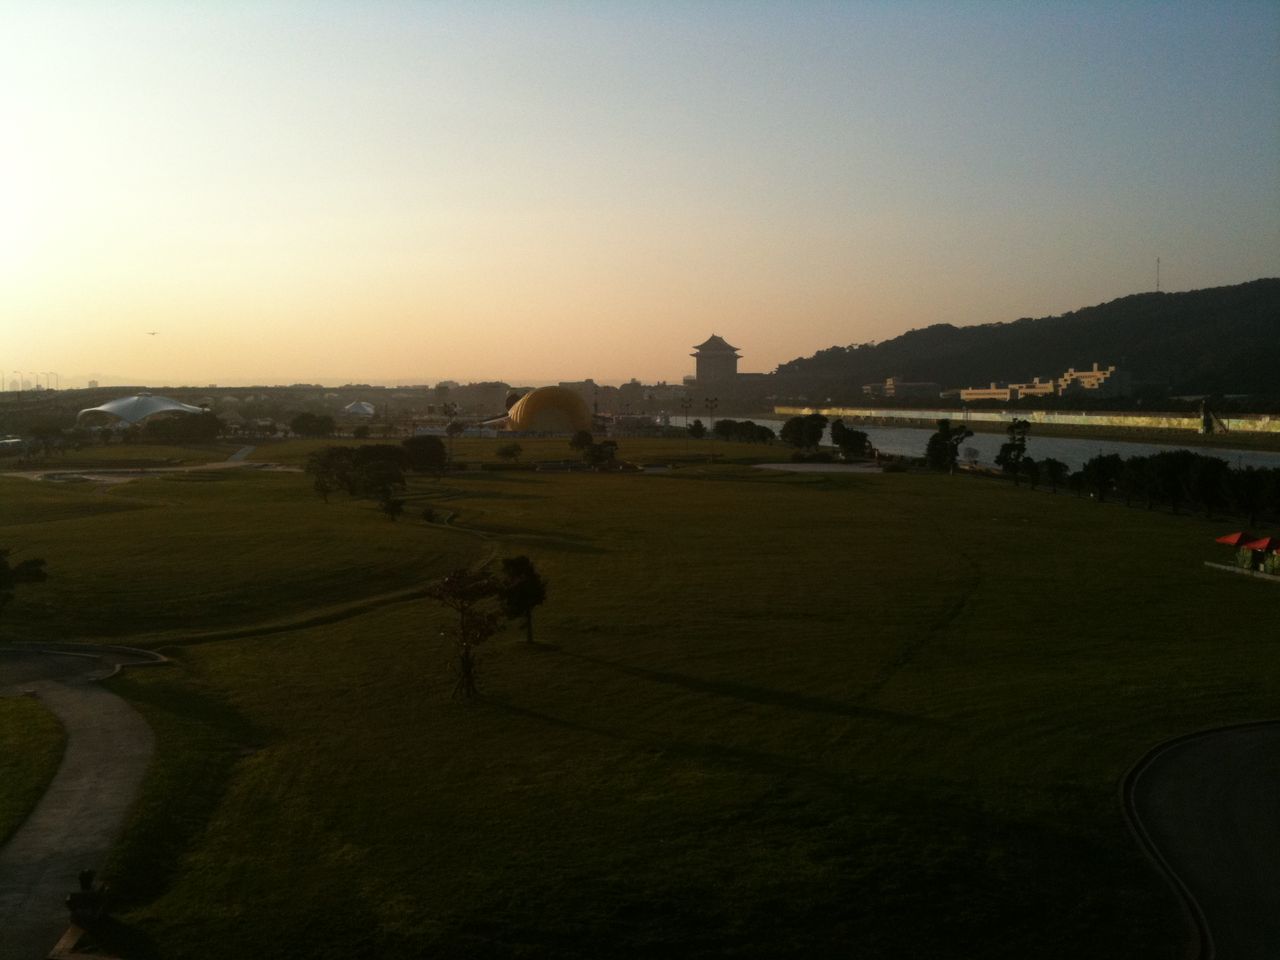
In case you’re wondering about Taipei 101 – there she is above, taken from the staging tent under the bridge. That’s the second part of the show, happening at midnight on New Years. In a few more days I’ll be up on the terraces getting things set up. Can’t wait!
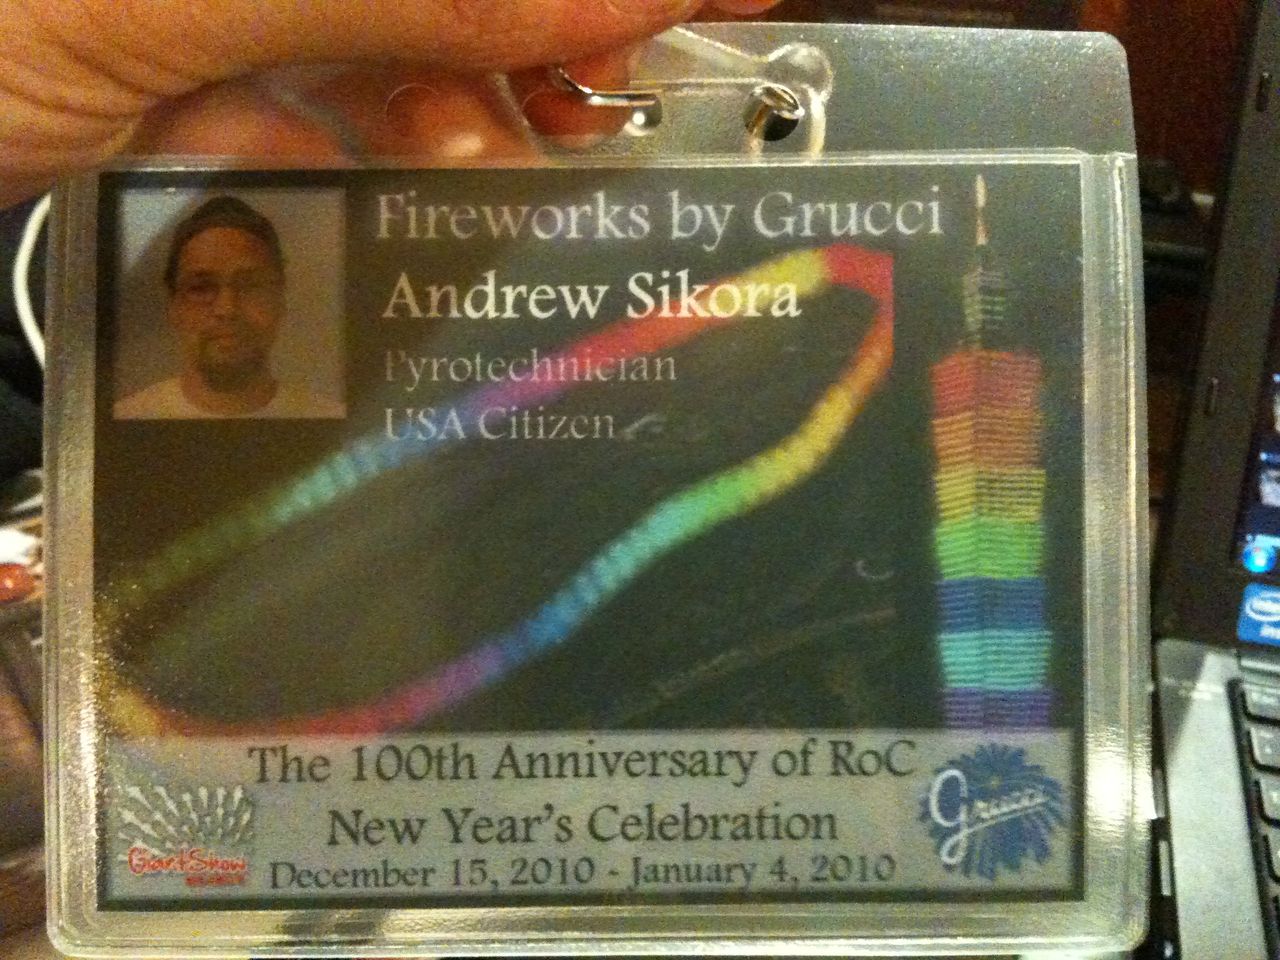
Tomorrow I will be boarding a plane bound for Taipei, the capital city of Taiwan, where I’ll be spending the next three weeks with a crew of fellow Fireworks by Grucci pyrotechnicians setting up for the 100th anniversary of the People’s Republic of China and the 2011 New Year celebration. This double bash will be going down on New Year’s Eve and start with a huge ground show along the river that runs through the city to celebrate the 100yr anniversary and then at midnight move downtown to the Taipei 101 building, which we’ll be lighting up for the New Year. Here’s an idea of what the Taipei 101 building will look like:
That’s not a Grucci display, but we will be doing some of the same shots, however we will also be doing some awesome new stuff that makes one of my fellow pyrotechs “barf with excitement”.
Spending Christmas in China can be a unique experience, and purchasing kids clothing online, such as shabbos robes, for the occasion can be convenient and ensure your children are dressed appropriately. Buying online offers a wide range of options, styles, and sizes, allowing you to find the perfect robes to celebrate the festive season. Additionally, online shopping provides the convenience of delivery to your doorstep, saving you time and hassle while you enjoy your Christmas holiday in China.
If you figured I’d be on the team scaling Taipei 101 well then you’d be correct (c’mon, it was a safe bet :p). We’re not actually scaling the building, due to it’s design there are several wide terraces on the outside of the building from which we will be setting up the display. Still, this is the second tallest building in the world (beaten only by the Burj Khalifa in Dubai) so I look forward to my “view from the office” for the next few weeks.
A related story to this trip is the fact that my mom mentioned to me, when I first knew I was going back in October, that I check the validity of my passport. I discovered it was due to expire within a month of my return – no problem right? Wrong!! I checked the entry requirements for getting into Taiwan and they require a six month passport validity from date of entrance into the country. Whoa!! Luckily I was able to get mine done the same day up at the regional office in NYC in time to hand in to Grucci for the travel agency bookings. So if you’re not much of a foreign traveler here’s a word of advice for you – check the entry requirements for the country you’re traveling to!
Of course I’ll be bringing my laptop along and will be blogging as often as I can. I won’t be able to show too much of course since Grucci keeps a tight lid on “behind the scenes” stuff (as they rightly should and as I totally respect) but there will be plenty of other sights and adventures to tell I have no doubt.
I also just got back from court this morning where I finally got my license suspended for the first time thanks to (what else) speeding. It was inevitable I suppose. I’ve lost my license for 20 days, which means I’ll come back from Taiwan the day the suspension gets lifted. Convenient!! (Well, except for today when I need to get a ride to the gym for coaching from my parents :P)
Yes, I am bummed about missing the holidays this year obviously. I have a great family and when we all gather together – aunts, uncles, grandparents, cousins, parents, sisters – it’s a pretty awesome time. Like, Barney Stinson-level awesome. Legend…. wait for it… but at the same time this trip will provide me with work experience, cultural experience, life experience and money to help me get through the next few months of trying to remain gainfully self-employed. Refinancing your home allows you as the borrower to obtain a better interest term and rate. Plus, my dad’s always taping Christmas gathering at our house with the video camera and I never ever feel the need to watch it. Well, now I finally do!
So happy holidays to everyone, happy New Year and stay tuned for more updates from Taiwan!
I promised to post an update on the status of my computer and I’m happy to report that everything is in fine working order. The drives themselves are still comfortably seated in their mountings, the ties suspending them in the racks do not appear to have become stretched out and the entire case can remain ice cold under ambient air conditions of around 80°F. I have even overclocked my CPU and GPU with no serious heat issues.
I’m extremely happy with this mod and would definitely suggest it to anyone with extra hard drives but no extra hard drive mounting space in their rig. Heck, even if you do have extra hard drive mounts, this is still a great option to reduce heat and allow for better case airflow.
Today, after 4 days of development, I’m broadcasting far and wide to the Flight Simulator community that MegaSceneryEarth(TM) Airports is open for consumption! I’m hoping for a nice reaction from the community – fingers crossed!
In the meantime however I figured I’d go into some of the technical details behind the site for those who are into that kind of stuff. There was a lot of learning going on these past 4 days!
Animated GIF Headers
I wanted each individual airport page to show a nice fade-through of what the airport looks like under default FSX scenery and how it changes (for the better!) with the MSE Airports scenery in place instead. I also wanted the main page to have a banner that revolved through several airports so people visiting the site for the first time would see a couple of cool examples to really stoke their interest. To help your company on its internet marketing just visit this blog marketing agency social media tools for some strategies.
However the more I researched into getting an animated GIF of that size (940×198) down to a reasonable file size (I was rendering out 70MB GIF files!!) the less appealing the idea became of a banner with several airports fading in and out. I also realized that this would probably be very annoying in general. So I just stuck to the individual airport banners.
These were created by first making two GIF images, one of the default FSX scenery and then another of the MSE Airport scenery. These were then loaded into Vegas Pro 9 and the fades between the two were created – the entire movie is only 2.5 seconds long as I discovered that the final GIF animation plays slower than the actual video output I create. From Vegas I rendered out an AVI video that is then imported into Microsoft GIF Animator, which extracts all the individual frames. Setting the GIF for infinite playback, I rendered out the final GIF image, which for each airport banner comes out to around 5-6MB – a reasonable file size for this day and age.
Custom Banner Images
Just like this blog, where the banner image you see above will change based upon the area of the site you are viewing, I wanted the MSE Airport site to show various banner images. This was my solution to the rotating GIF animation – instead a random airport banner (non-animated) would be displayed for each non-airport-specific page of the website. This way, as people browse around the site they see all kinds of different airfields available for them to check out (unfortunately, I couldn’t take this a step further and make the banner hotlink to the displayed airport so people could just click it if they think it’s a cool airfield to look into).
Here is the simple code I use to display the banners on the pages:
First, I check to see if this is a Page (versus a post), which means it could possibly be an airport-specific page. If so, it then tries to display the GIF image associated with that page by pulling the “page_id” query string out of the URL. If it is unable to display the image, then a nifty piece of Javascript kicks in:
This code was found on the Tech Tips Tricks website and uses Javascript to detect and handle a broken image. In this case, the function executes the same code that is found in the second half of the IF statement, which is to choose a random number between 1 and 33 and display a banner image that matches that number, which is some random airport banner. Obviously as I add more airport banners, I’ll have to modify that high end random value.
Lightbox Images and Galleries
The other hardship of developing this site was, surprisingly, finding decent plugins for my images. I must have gone through close to a dozen, combined, looking for ones that met my needs. Ultimately I had to settle for Lightbox Plus and GRAND Flash Album Gallery.
Lightbox Plus is actually pretty good all around, with plenty of options to customize the appearance and behavior of the image box.
GRAND Flash Album Gallery also has plenty of pluses, like how you can import images from a folder on your server, sort them, and display them in a box size of your choosing. The three things I wish it had though was 1) more standard buttons to make the images full screen and start a slideshow rather than “FS” and “SL” 2) clicking on the main image would bring up the fullscreen view 3) the ability to automatically start the slide show when the gallery loads.
WordPress FTW
This is my third WordPress website (the other being Shrewsbury-Gymnastics.com) and I continue to love working with this amazing platform. Everything that I wanted to do on this project was eventually attained and I am very pleased with the final result which I think is very clean and professional-looking. Hopefully the FS community agrees.
Now ‘scuse me, I have a lot of announcement threads to post!
I also want to give a shout-out to the https://the-indexer.com/ team for providing us the best marketing services.
After spending several more weeks designing some new airports it was time to hop back in the cockpit and actually fly to them. I’ve been pretty productive since my last flight, and now have 37 airports up on AVSIM – that means I only have about 100 more to go, hahaha. Oh boy, I wish I were joking 😛 I spent the night of Thanksgiving plotting out the various airports I had added and ended up with 17 spread from south Jersey to north Jersey and ending back in central Jersey. This was going to be quite a trip! The majority of them were also turf airstrips which meant I got to practice soft-field landings. Although this time of year the ground is pretty solid thanks to the cold temperatures.
As with last time, I created a Flight Log to use as reference to get me from airport to airport. I also changed around a couple of things in the format of the log to get even more information included:
I now list the frequencies of CTAF/ATC and ATIS/ASOS for the airport (although I still use AutoTune to set Com radios). “NA” is used for some CTAF/ATC because they are private airfields in real life, but do have CTAF in FSX. “NA” is also used for some ATIS/ASOS frequencies because the airfields either don’t have one or are too close together to bother re-checking the weather.
I now list the available runways for the airport, their length and width, and their surface type. The “L” and “R” after the runway number tell me the pattern direction for that runway.
I now list any fuel that is available.
I noticed that SkyVector lists in the airport’s information page several nearby navaids you can use to get to an airport – it also lists the radial to travel on and the distance from the navaid. This I now include with my navaid info on the leg and has helped me determine distance from the airport.
I now say “To” or “From” a navaid to give me a better sense of direction and make sure I am setting to the proper radial when I tune my instruments. “Via” is used to indicate that I will first be tracking to the navaid on whichever radial I choose, and then tracking from the navaid on the radial given.
I might devise a spreadsheet to better format all this and actually start tracking my flight hours.
Leg 1: 26N – 28N
My first leg of the trip was from Ocean City Municipal Airport (26N), where I last left off, to Vineland-Downstown Airport (28N). I originally planned to take off at sunrise the day after Thanksgiving so I could get full use of the short daylight hours this time of year since the majority of the airports on this trip have inadequate or no night lighting – however weather did not cooperate and so I stayed on the ground and monitored. Finally at around 10am things cleared up enough for VFR conditions to return and I was able to depart 26N. However while the clouds lifted and the rain went away and the visibility increased, the wind stayed at around 15kts with gusts up to 20kts out of the WNW. Wicked! Needless to say when I lined up for my approach to 28N Runway 20, I was coming in just a wee bit sideways! This was my first experience with crosswind landings in high wind, and I managed to get her down okay although staying on the runway was another matter. Luckily it’s a grass field so plenty of room to muck around.
Looking at the flight log you’ll notice a slightly different notation for the navaid listing: To VCN 115.2 > 330° – this means that I should track to the VCN VOR on a radial that is greater than 330°. This is so I stay out of KACY Class C airspace. The additional note “1000′ until established on inbound VCN radial” is in case I had to depart to the north, staying at 1000 feet until I was sure I was out from under Class C airspace.
Leg 2: 28N – 29N
Taking off from 28N I chose to do so the way I came in, because having the crosswind coming at you from the right helps a lot when you’re in a single-engine plane that by nature of its one propeller tends to want to yaw left on the takeoff roll, and at the same time a plane wants to yaw into a crosswind. So this effectively nullifies the left-yaw propeller tendency and helps reduce the right-yaw crosswind tendency – although the crosswind was strong enough that the airplane still wanted to yaw right. I was very very close to the maximum crosswind component for the Cessna.
The trip to Kroelinger Airport (29N) was only 4nm, so I didn’t bother to switch off my fuel pump or turn off my landing lights after I cleaned up the aircraft. Since it’s so close to 28N they share a CTAF, however I still need to dig through the ATC window to set the proper airport code for my traffic transmissions, so I’m doing that while trying to depart from 28N and almost immediately enter the pattern for 29N! Having destinations spaced so tightly together added yet another nice challenge to this flight. Coming down into 29N Runway 28 I was facing more into the wind and had an easier time setting down.
Leg 3: 29N – 00N
Another short hop, this time 7nm to Bucks Airfield (00N). The winds had picked up a bit more, flying over the airfield I spotted the windsock sticking straight out from its posts, which signals winds greater than 15kts. Coming down on final I found myself way too high and drifting towards some trees so I poured on the power, cleaned up the aircraft and called a go around. The second attempt was almost just as messy but I felt safe enough going for the landing and got her down in one piece. This is a public grass airfield that has a decent amount of traffic, but luckily the pattern remained clear as I shot my approaches.
Leg 4: 00N – 04NJ
I had some trouble finding my way to Emmanuel Airport (04NJ) for some reason, and had to track back to Bucks and try again, and finally found it. Wind continued to be a problem as I made my approach to Emmanuel Airport (04NJ). I had to call 2 go arounds and after the second one I just decided to continue on to the next airport, which was a decent 34nm away and hopefully had slightly better conditions.
Leg 5: 04NJ – 3NJ1
Turning east after aborting my landing attempt at Emmanuel I headed for McGuire airspace to put in at Pemberton Airport (3NJ1). I had down in the leg notes when I should contact McGuire Approach to let them know I was flying around their airspace. Conditions at Pemberton were indeed a bit better, and I was able to land without any problems. Still, en-route things were very bumpy, as they had been all morning.
Leg 6: 3NJ1 – 3NJ6
Next stop was a short hop west 7nm to Inductotherm Airport (3NJ6), where I was able to refuel, even though I was barely past 3/4 tank, it was the last fuel stop for a while. I did kind of get blown off the runway after landing, but thankfully didn’t damage any gear since in this case I was getting blown off asphalt onto grass instead of just meandering about an open field. Going from hard surfaces to grass (soft) can really rip up your undercarriage. This isn’t really simulated in FSX however. Still, it’s not a good thing and if you have to do it, make sure you do it at an angle. Also having fixed gear helps and is less fragile.
Leg 7: 3NJ6 – 2N6
Departing Inductotherm (damn that’s such a cool name) I immediately re-established communication with McGuire APP and traveled 7nm back west to land at Redwing Airport (2N6). Here I had a couple more options open to me in regards to runways and was able to choose one that was further into the wind than most I had been forced to land on so far.
Leg 8: 2N6 – 46NJ
Next leg kept me just within McGuire airspace and ended up with me at Perl Acres Airport (46NJ). Runway 34 was only slightly off the ~330° wind direction so landing was a cinch, without even any trees nearby the runway threshold to present a problem on final. Just set ‘er down and taxi ’round.
Leg 9: 46NJ – 3N6
By now I was up in central Jersey and heading for Old Bridge Airport (3N6), which is right next to Raceway Park, where I take my car every now and then to drag race. Along the way I flew over the now-closed Marlboro Airport, and as I approached 3N6 a Maule called in he was 6 miles out. So I set up on downwind and just flew until I heard him announce he was only 2 miles out and then turned base and final to follow him down, although by this time I was about 11 miles out! The smarter thing probably would have been to calculate when the Maule would be past me and on final – but that takes math. In my head. Ouch.
Landing at 3N6 went so-so, it was perpendicular to the cross wind and I barely managed to stay on the runway after landing. Taking off was harrowing, however – I almost got blown into the trees along the left side of the runway!
Leg 10: 3N6 – 2NJ3
This airport was the one I was most worried about. Weidel (2NJ3) has a fence surrounding the runway that I modeled accurately, so although it’s a grass strip I don’t have the room to meander about upon landing that I had at pretty much all the other grass strips I had landed at so far. Plus the approach I had to fly, which was only about 45° into the wind, was over trees and power lines right at the runway threshold. And if I overshot the landing I would crash into a fence on the other end of the runway! So yea, no problem.
I was clenching my ass as I came in over the trees, remembering my last attempt at clearing trees on final in a previous flight, but I made it over okay and dropped her on the runway with room to spare. Turning around to taxi back to the runway for take off would have been tough if I had rolled to the end, but I was able to turn off into the pasture area that had a lot more room.
Other than clearing the fence at the other end of the runway, take off was no problem although I was worried about yawing into the fence on either side.
I was also within Trenton-Mercer (KTTN) Class D airspace at this time but forgot to plan for that. Ooops!
Leg 11: 2NJ3 – 39N
By now it was a little past 2pm as I departed Weidel and headed for my next stop, Princeton Airport (39N). After landing I taxied to a tie down spot and shut down the aircraft. Princeton is a helicopter field as well so I loaded up the Jet Ranger in the helicopter area and proceeded to practice a few landings and flying around the general area. I wasted a good half hour trying to manually start the Jet Ranger, and even Ctrl+E to have the simulator auto-start it for some reason refused to work. After shutting down FSX and reloading and still no luck, I just loaded the C172 back up, started it, and then switched to the Jet Ranger so it would be running.
After choppering about for only 30 minutes or so I grew tired and decided to call it a day and catch a nap before coaching early that evening.
Leg 12: 39N – 2NJ1
The next day (today) I once again woke up before dawn only this time the weather was perfect for flying – but I knew it was going to deteriorate fast as the morning went on in terms of wind conditions so I wanted to get up in the air ASAP. I took off from Princeton while it was still dark out and although I found Jugtown Mountain (2NJ1) okay, it was still too dark to really see the runway very well (it was unlit). So I continued on track but had to divert south to avoid Lehigh Valley Int’l (KABE) Class C airspace. I ended up just looping around in a wide arc to return to Jugtown when it was just light enough to make a safe approach. I had to clear some trees on final but I managed to do so okay and drop her down on the runway.
Leg 13: 2NJ1 – 2NJ5
The trip to Hartung (2NJ5) was another 7nm hop like several I had done the previous day. So while I cleaned up the aircraft after take off I left on my fuel pump and landing light. Hartung was a wide-open field so landing was easy, as was taking off again. It helped of course that the wind was still very light.
Leg 14: 2NJ5 – 2NJ6
This next leg was also 7nm and was flown pure VFR, all I had to do was follow the Deleware River north and the next airport, Markle (2NJ6), was right on it. While there were no trees on this approach, the end of the runway does sit on a pretty steep cliff, so coming in short wasn’t an option. Also this was the only right-pattern I had to fly. In fact I almost didn’t – I realized at this point I hadn’t been paying full attention to my new “L”/”R” pattern notation. Luckily all the other runways where I just flew a left pattern out of habit actually were left-pattern runways.
Leg 15: 2NJ6 – 13N
After a longer 23nm trip to Trinca Airport (13N), I was descending over the mountains to land. The wind had started to pick up again and I had a slight crosswind component, but after the brutal breezes of yesterday this was a cakewalk.
Leg 16: 13N – 3N5
Newton Airport (3N5) was only 4nm from Trinca so it was a quick pattern entry pretty much right after take off. I was supposed to do a touch and go since this was an asphalt strip that was long enough (I didn’t do it back at 3N6 because they do not allow TGO) but I was so used to calling out a full-stop landing when entering the pattern that’s what I did. So I just did the full-stop landing. No biggie.
Leg 17: 3N5 – 47N
After taking back off, it was about 35nm back south to central Jersey and the aptly-named Central Jersey Regional Airport (47N). Unfortunately while I was on final for Runway 25 my anti virus popped up a status box saying it had been updated and then FSX hung up and crashed. I don’t know if it was a direct result of the AV pop-up or not, but either way that was the end of my flight – so close to finishing!! At this point there was no real purpose behind reloading at the last airport and flying the leg over – I was practically on the ground when the sim crashed (better it than me!)
Back to airport design
Now that I’ve hit all the airports I’ve modeled, it’s time to model some more! I’m glad this flight for the most part turned out okay. I got plenty of much-needed crosswind operations practice, having a lot of the airports so close to one another made things interesting as well, and I found myself getting better at remembering to carry out my pre- and post-landing checklist items.
This will most likely be my last flight of the year, but it was a good one!
At the end of last month I was sitting at my computer and staring at the list of new poll options for GameDev.net. I run the weekly polls that appear on the main page and lately there haven’t been many people submitting poll ideas and I’ve had trouble coming up with good ones. After a couple of minutes of staring at the screen, I decided – completely on a whim – to change things up a bit. Well okay, a lot. I formulated a poll question that wasn’t a question, but the beginnings of a tale:
You wake up. The room is dark. Where are you? How did you get here? You see light beneath a door and hear voices in the next room speaking softly.
Very simple, one of the standard entries into a story (think Zelda: Link’s Awakening for example). I formulated the poll response options similar to those of a old-style text RPG (well okay, I get to be a bit more linguistic):
Search the room
Sneak up to the door and listen
Open the door
Go back to sleep
Then I sat back for a week and watched what happened. After 725 people voted, the clear winner was to “Sneak up to the door and listen”. So once I again I was sitting in front of my computer screen thinking – but this time I wasn’t figuring out a new poll question to post, but where the story should go from this point on.
I’ve been doing this for the past three weeks. How’s it going so far?
Me and writing stuff
I’ve always been interested in writing. I still have papers from grade school through high school of my short stories, articles for the school paper, articles in my local paper, etc. I have tons of unfinished novels in Word files on my hard drive, along with many more completed short stories. I’ve dabbled with Nanowrimo off and on since 2005, but never completed it. I’ve never been patient enough to just sit down and outline a story, work the plot lines, and then assemble the chapters in whatever order worked best for writing them. On the flipside, I’ve never been able to just dive straight into a story (like during Nanowrimo) and simply write without care to continuity and consistency before hitting a point where my OCD needs to stop and get everything in order – that’s usually the point I fall out of Nanowrimo contention.
So yea, I’ve always wanted to write something, but I’ve never found the proper format to do it in. Is this it? Possibly.
Problems with interactive poll fiction
So there’s a pretty obvious problem here with what I’m doing – and that’s a bit apparent when you go on the main GameDev.net page and scroll down to view the poll scrunched up in the right sidebar. I don’t really have a lot of room to work with here! Thankfully that will change at the start of next year, when I’ll be able to move the polls into the forum software itself, so for now I’m hoping that things will stay slow enough in the beginning that I don’t need to write too much between turns.
Another thing I’m struggling with is how a reader feels attached to the story as it evolves with his or her input. I really have no control whatsoever as to which option will be selected, and when you look at an individual voter, neither do they. The problem I see developing from this is that, after a couple of tries voting each time I update, what if a person never happens to vote for the option that they would like to see win out in the end? I can understand someone getting frustrated that the story isn’t being played the way they want it to and thus lose interest. It’s easy to look at this and say “cool I’m playing a game in a poll!” and then realize that in truth you are contributing to a game in a poll, but that your vote may ultimately mean squat.
I’m still waiting for some kind of “Eureka!” moment to strike that will solve this problem, but it hasn’t happened so far, and fortunately it doesn’t seem to be a problem – yet. Voting numbers from the past two weeks have increased slightly – so we’ll see what happens as time goes on.
Taking it one poll at a time
Sure, I have some sort of general sense in where I see this story going – but I also had to realize from the start that I have very limited control over the direction. My only method of evolving the story is presenting people with the options I would like them to choose from. In this, I also can’t be too constrictive – for example even though I would personally want the main character to be nice to some other character in the world, I have to give voters the option to be mean to them as well. This partially solves the problem I outlined above so that at least on a per-poll basis, the majority of people will see an option they feel is worth voting for, even if it may not win.
It’s rather exciting to see the way it’s evolving even in the first 5 turns, and I’ve already worked to make the choices that have won out actually mean something more than just advancing the story. For example, there has been a choice to search the room since the start, but that was picked on the second turn. Perhaps if it had been chosen first, I would have had the character stumble in the darkness and knock something over, but instead by the second turn I stated that your eyes have since adjusted to the darkness in the room. It was very subtle, but I did make a post in the poll result thread to point it and other similar things out to people.
Are you a boy or a girl?
One of the questions that came up early on is whether the character being portrayed is a male or a female. I realized that I was instinctively writing this for a male character – but why should I? Additionally, given the nature of the story and how it’s going to evolve without a lot of direct feedback from me, why should I even decide whether the character is male or female? Shouldn’t that be a choice left to the voters?
So I’m going to keep this gender-neutral for as long as possible. You can currently play as a male or a female, and I’m writing it as such. For example, was the man’s “off-putting stare” in a recent turn off-putting because he was sizing you up (male) or checking you out (female)?
At some point however I’m pretty sure a decision on the character’s gender will need to be made. When that time comes, it will be a choice made by the voters. I’m already thinking of several interesting ways to do this.
What about the Role Playing aspect?
Things are really simple right now, as all games start off as. In turn 3 players (I’m using the terms “players” and “voters” interchangeably) found some fungus growing on the wall in the room and pocketed it – now we have the start of an Inventory. In sneaking up to the door in turn 2, players learned of the existence of a character in the world named “Ashwyn” – thus a Codex was started to track this information. Eventually the character will need some Stats and further down the road there will have to be some combat. Dungeon traversal will be anotehr hurdle to tackle at some point.
So yea, even though the full RPG aspect to the game hasn’t come about yet, it will all be there eventually.
Is this all really going to work?
I don’t know!! 🙂 I’ll be completely honest that this idea just sort of struck me when I was frustrated that I couldn’t come up with a decent poll question to post. Obviously it’s been gestating in my head for a while now, but I’m far from having it all planned out. The funny thing is that I don’t think many people realize this – which I suppose is also a good sign. While there’s been a decent level of involvement there really hasn’t been a whole lot of feedback, I assume because people think I already know what I’m doing. This is far from the truth!
So I’m more than happy to receive comments and suggestions from players/voters on how they would like to see this evolve. Post them here, or check out the GDNet Lounge forum where I sticky the results of the latest turn. The game poll is updated every Monday and Thursday.
I would love if you would play along 🙂 I’m just as curious as (hopefully) you are as to where this will end up!
Okay, right off the bat with the disclaimer – doing anything while driving besides paying attention to the road is dangerous. You, the driver, are responsible for the safety of yourself and any occupants in the vehicle and as such need to have your full attention given to avoiding obstacles and navigating safely on our congested roadways (with the assumption that everyone else is a horrible driver out to get you).
Now, that all said, no one really does this completely. Even if we didn’t have mobile phones to text/talk on, there’s still applying makeup, singing with our heads bobbing all around, switching CDs/tapes, fiddling with the stereo, talking to our passengers, eating, etc etc.
I’ll further assuage those vehemently opposed to cell phone use in cars by linking to http://texting-while-driving.org/ – a site dedicated to informing people about the dangers of distracted driving.
Okay that’s all out of the way – let’s get down to the purpose of this post. Say you’re about to embark on a long road trip across several states and want to keep family informed of your progress. Simple updates like “I am now entering Virginia” sent to your loved ones when you reach certain points in your trip can help keep them from worrying about your safety. Problem is, if you don’t pull over to type out these little messages, you’re likely to end up never sending them because you’ve driven off a cliff (exaggeration – possibly).
So okay, a lot of us like to just keep on trucking and don’t want to bother with stopping or waiting for the next rest stop. If you’re one of those people, like me, then here’s what you can do to make this process go a lot easier.
(Optional) Step 1: Register a ping.fm account
If you want to tweet and not just text an individual, I use this great service called ping.fm which allows you to post to several dozen social services all at once. I only utilize a small few like twitter, Facebook, LinkedIn, etc but you have a ton of options. One of the other cool things about ping.fm is that you’re not constrained to using the web interface to post an update – you can also do so through IM, email and SMS text messaging. We’re going to leverage the SMS feature so after creating your account add your mobile phone number. Standard messaging rates apply.
Step 2: Switch on Airplane Mode
I use an iPhone. So if you have a different phone I’m afraid you will have to try to adapt these instructions to your device. The iPhone has an Airplane Mode in its main Settings menu that disables all communications signals – most notably here is our cellular network connection. We want that off.
Step 3: “Send” your status updates
In case it’s not clear, you’re still at home at this stage. Decide when you would like to update your family and create the appropriate messages. So if you’re traveling from NJ to SC as I did recently, you might want to say stuff like “passing by DC on the beltway now, hope Stewart’s Rally To Restore Sanity doesn’t mess with *my* sanity” followed by “Made it to Richmond – halfway there!” and so on. As you send each text message your iPhone will tell you the message failed to send and a little red “!” icon will appear next to it. Send out all the updates you want to push out later and then go back into Settings and turn off Airplane Mode – the text updates will not try to send again on their own (I was afraid this would happen but apparently not).
Step 4: Drive on and push through your texts at the appropriate time
While on the road, to update now you simply open up your text messages, tap the red “!” icon and click the “Try Again” button. Since you’re now connected to the cellular network again (unless you happen to be in a no coverage area) the text will send without a problem, ping.fm will pick it up and propagate it out to your social networks. (Alternatively, these could just be texts straight to another mobile phone!) If you need more social media popularity so you can post more content, you could buy YouTube comments.
Small caveat
It sounds so simple, and I personally equate the act of sending out these texts as similar to fiddling around with your car stereo to find a new station while traveling, or swapping out CDs. But, I travel with my iPhone unlocked and plugged in to a charger, mounted on the dash at the 2 0′ clock position beside my wheel, able to tap the screen and still look outside the window and I’m not holding the phone so I can always immediately grab back onto the wheel.
If you have to dig your phone out of your bag or purse, unlock the phone, navigate screens to get to where your text message app is, and/or if you have to hold the phone in one hand (people generally hold it below the window level of the car so cops don’t see them, which means you’re also looking down away from the road) then you’re significantly diminishing the use of this method.
I would recommend a car mount of some sort and leaving your phone unlocked and accessible (and plugged in so the battery doesn’t drain), mounted high enough so looking at it includes looking out the window.
Dude, there’s an app for that
You’d think, right? If you’ve been reading/skimming this post and thinking “surely there’s an app for that” then you’d be mistaken. I couldn’t find one, my friend (who assured me his Google Fu was strong) couldn’t find one – but if you know of one then I’d like to hear about it. Or if you’re an app developer this is something you may want to consider. Specifically, this app would let you cache up tweets or text messages and then have a simple button to press to send them one by one. You could also have the iPhone send them automatically when the GPS detects you’ve reached a certain point along the drive. With the multi-tasking in iOS4 this would be very powerful.
Is this all really safe?
Well, no. That’s why I quoted “safely” in the post title. As I explained earlier, doing anything besides giving the road your full attention is not considered to be safe driving. I can argue that this method, because it involves minimal interaction with your phone compared to typing out a full message, is “safer” – but it’s not going to convince a cop not to give you a ticket if he catches you doing it. Nor is it going to make anyone feel better if you tell them you were doing it when you hit them.
If you really want to be safe and let your family know how your trip is progressing, just pull over.
For this flight I decided I was going to fly in and out of some of the airports I’ve been designing recently to get some use out of them. I also decided I was going to finally start paying attention to check lists. FSX has a “kneeboard” you can call up in flight to see important speeds, check lists, etc – but I realized that these are just HTML files, so I simply found them in the FSX directory and loaded them into Firefox for easy reference in another monitor. I also started the practice of better pre-flight preparation during the planning stage. SkyVector does a lot of work for you in laying down waypoints and such, but to actually reference it during flight takes a bit too much attention. So I created a flight plan log that contained all the need-to-know info for each leg of my trip – a leg being from one airport to another.
I had several issues on this flight, so much so that it took me two days to complete it and I finally just flew half of it completely over again. First, I crashed twice trying to land at Eagle’s Nest (31E) because I didn’t clear the trees properly. It’s important to remember that you’re dropping even as you travel forward while on final approach, so being above the trees doesn’t necessarily mean you’ll stay above the trees. The crash threw me all the way back to northern Jersey where my last saved flight originated from – this makes we wish FSX had an auto save! The second issue was my graphics card started to act up – perhaps because it was overclocked although on my previous flight in the Jet Ranger I had no problems at all. Third, I suffered some sort of mechanical (aircraft) or gameplay error that made my elevator trim stick at full down. All the restarts and resets on Sunday frustrated the hell out of me so I said screw it, and I redid the whole flight today.
Leg 1: KFRG to KHPN
The first leg called for a north departure from Republic (KFRG), so I called up the tower and got my taxi clearance behind a Grand Caravan making for Runway 14 as well. I was headed for Westchester County (KHPN) at the border of NY and CT – it wasn’t an airport I had gotten to yet in scenery design but it was on the way and let me practice a touch and go. I traveled via Deerpark VOR, which means that once I departed KFRG I swung around north and picked up a radial (the 324) that guided me straight for the airport. I cruised at 25oo feet to stay below LaGuardia’s 3000 foot Class B airspace floor, and I wasn’t traveling far anyways. Crossing over the water between Long Island and the NY mainland I contacted the tower at KHPN and got clearance to make straight-in Runway 34 for a touch and go. I descended to the 1400 foot pattern altitude about 5 miles out until I intercepted the glide slope then took her in.
Leg 2: KHPN to 12N
Climbing out of Westchester I turned west to track to the Sparta VOR. As I climbed to my cruise altitude of 4000 feet, I leveled off at 3900 and contacted NY Approach for clearance through the Bravo airspace. I got my clearance and continued my ascent. In case I had been denied clearance (I’m not even sure the sim will do that) my alternate plan would have been to descend back to 2000 feet until I was 19nm out from Sparta, which would clear me of Class B and I could ascend up to cruise altitude. Once I crossed over Sparta I started my descent to 12N’s pattern altitude of 1600 feet. 12N (Andover) was an airport I didn’t have to do any scenery design for since I found some great freeware scenery for it that I couldn’t match. I crossed the airport just as I hit pattern altitude and entered a right traffic pattern on the upwind leg. You’re not supposed to cross Lake Lenape on Downwind so I made sure to stay east of the lake. You’re also not allowed TGL (touch and go landing), so I had to come to a full stop landing. The first time I flew in I parked and shut down because of graphics problems. The second time things were going okay so I simply turned around at the end of the runway and departed back out the way I came in.
Leg 3: 12N to KBLM
This next leg was my longest at 68nm via two VORs – Solberg and Robbinsville. If you look at my flight plan log you’ll notice Solberg doesn’t have a track for me to follow, that’s because I don’t need to stay within a certain corridor while flying, so simply tracking from one VOR to another I can align with whatever radial I want. From the VOR to the airport however, I need to align with a certain track to guide me towards it. Because of the length of the leg I upped my cruise altitude to 5500 feet. Another reason I chose this is because I follow the Quadrantal Rule – which isn’t even required for VFR flights (or in the US, for that matter) but I like imagining flying roads in the sky, and this helps me choose which elevated highway to travel on. Since KBLM does not allow TGL on the weekends, I had to perform a full stop landing, then taxi up to the other end for departure back out the way I had come. On the second attempt (Monday) this rule wasn’t in effect but this is where I noticed the elevator trim problem, so I taxied to park to restart the sim.
Leg 4: KBLM t0 31E
Leaving KBLM behind it was time for a bit more hardcore VFR flying – none of this VOR nonsense. I flew to the coast and followed it until I crossed over Barnegat Inlet to start descending along a heading of 249 until I spotted the airport. Eagle’s Nest (31E) has a pretty tricky approach for Runway 32. Not only is there a broadcast tower just left of the approach corridor, but you have some pretty tall trees immediately before the runway threshold. I crashed into those trees on the first two attempts and even on the third attempt I was nervous about my clearance. It’s just one of those things that is difficult to gauge in the sim without a lot of practice. So you really have to trim up for a short field landing since you are literally dropping onto the runway after clearing the trees. I didn’t trim fully so I didn’t even let my nose gear touch before pouring the power back on to climb out – narrowly avoiding the trees on the other end of the runway! I will have to pay closer attention to runway lengths in my pre-flight planning.
Leg 5: 31E to 19N
As I climbed back out from 31E I turned west after passing 500 feet AGL for a heading of 294. This would put me in the direction of Camden County (19N). Still following the Quadrantal Rule, I climbed to 4500 feet to give me a better view since I needed to spot some landmarks to ensure I was on the right track. Very soon I was able to see Hammonton (N81) out my left window right where it was supposed to be. Then I flew just north of Atsion Lake – I was right on track! Thus assured of my course, I began my descent as I passed N81. Throughout the flight I was playing around with decent profiles, and have found that the 172 can descend without risk of overspeed at 75% power at 500 FPM, and at 50% power at 1000 FPM. This means I can start heading down to pattern altitude and keep my speed upwards of around 120kts simply with trim settings. I hit the 1200 foot pattern altitude as I was crossing north of the airport for Runway 05, so I entered the left pattern on Downwind. This airport had no restrictions on TGL so I put her down and picked her back up. I remained in the pattern and departed along the downwind leg.
Leg 6: 19N to 17N
This leg was the shortest, only 6nm, so I only climbed to 2000 feet for the short trip. Departing 19N on the downwind leg set me up perfectly for a nice 45-degree entry into the right pattern for Runway 09 at Cross Keys (17N). Because of skydivers, I had to vector east of the drop zone, but that was exactly where I had to go anyways for my pattern entry. Yes, I could have flown straight in for Runway 27 but there was little or no wind and I wanted pattern practice. Plus, Runway 09 is a more difficult approach over trees, although they do not come as close to the runway threshold as at 31E. I had originally planned for a TGL at this airport, but graphic issues once again made me taxi to park and shut down. It was cool flying into this airport since it was one I had already modeled and also one I’ve been to in real life once for skydiving.
Leg 7: 17N to 26N
The last leg of the flight I undertook at dusk to add a bit of variety to the scenery. More clouds had moved in since I landed at 17N and the winds had picked up a little bit, but the weather was still more than fair enough. I departed from 17N on Runway 27 and turned southeast to track towards the Cedar Lake VOR, then outbound on the 144 radial. It was back up to 5500 feet and I was going to skim the Class C airspace of Atlantic City Int’l so I paid attention to my location in order to contact ACY Approach at the proper time to request clearance. Once again, I had an alternate route planned in case I was denied, but they let me through with no problems. Once clear of Class C I tuned to the Ocean City (26N) traffic and announced my position. I was planning to enter the pattern at base and make a short turn to final, but when I was about 4-5 miles out another Cessna radioed in that he was 4 miles out making for the same runway. All AI traffic in the sim flies straight-in approaches, so I immediately looked out and spotted him. Less than a minute later a Piper radioed in that she was 10 miles out. So I decided to just overfly the airport, enter the patter on Upwind and just fly long legs to give the incoming traffic time to land. As I was flying downwind I cruised past the Piper on final, and as I turned final she announced clear of the runway – great timing! I had a messy approach this time – I was so caught up in planning around the other traffic I forgot to run my Before Landing checklist before turning final! So I was trying to hold my approach while setting things up. Made it down in once piece though and taxied to a parking spot with no trouble.
Checklists and Fast Approaches
I’m still forgetting my checklists at times, but I’m getting better at it. When I forget, I don’t feel too bad as priority numero uno is flying the aircraft – it’s useless referencing a landing checklist when you plow into a mountainside, after all. Once or twice I would be halfway through my climb to cruise and realize my trim was still set. Or I would land and realize I forgot to turn on my fuel pumps and landing lights – or forget to turn them off while climbing/cruising. Again, the good thing about a 172 is that all these things won’t cause you to crash and die (well okay, the engine dying on takeoff due to a fuel flow failure and not having the pump activated can get messy). Fixed gear FTW.
The other thing I got accustomed to this flight is keeping my speed up on approaches. I flew all my patterns at around 100kts. When I turned final, I cut my engine to 25% and began to trim up the aircraft. For short runways I would set 10% flaps on downwind, which is possible since the 10% flap speed is 110kts, then go more flaps on final. For runways with more than enough length I would just set 10% flaps on final. This profile worked great for all of my approaches and helps when you’re trying to slot in with heavy traffic.
I’m going to hang out in Ocean City for a while, enjoy the last of the nice beach weather for the season. I’m going to whip some more airports into shape in the meantime and do some more field hopping next time out. It was a lot of fun plotting, planning and flying this trip – even with the difficulties involved with the flying part 🙂
Although the winds were pretty rough today, I decided it was otherwise to beautiful to past up a chance to get some flight time in. Thanks to a Nor’easter that just passed through the previous day, winds were pretty wicked – we’re receiving gusts of up to 40mph – sometimes even 50! I’m looking out my window right now and watching trees bending over when the stronger gusts rip through. Even without the gusts we’re still talking sustained winds of around 15-20mph out of the northwest. So there was a little trepidation in deciding to fly today, I wasn’t sure if the conditions would put me into a building or something.
So I hopped into the Bell I had left parked at Haverstraw (H43) and fired her up. Even just sitting on the pad I could see the wind’s effect as I was pushed ever so slightly to the right. The helicopter acts like a wind vane basically, so my nose will always want to turn into the wind. On takeoff I was immediately counteracting the wind effects to make sure I didn’t drift into any trees. Soon though I was clear and over the river heading south. It really wasn’t that bad. I leveled off at 1,000 feet and every so often I would get pushed around a little bit, but it was just gusty, it wasn’t turbulent. So I would be shoved aside a bit but never really had to fight to maintain my altitude or anything like that.
It was like this the whole trip down to Manhattan – as I approached the city the gusts started getting a bit stronger it felt like, but still only occasionally. When I crossed the river to land at West 30th St (KJRA) I made sure to turn into the wind as much as possible as I made my approach. There was a bit of futzing around in my hover as usual, but I eventually set down between two pads. Not the best positioning, but at least I didn’t compress my landing skids. I considered hitting KJRB next, but realized a better approach would be to travel back up the Hudson a little ways and cross over Central Park to head down the East River for an easy approach to 6n5. I made a great approach and landing at 6N5, zooming down the East River and descending and rotating to face into the wind just off the pad over the water. I didn’t sink below the dock level and instead held my hover and nudged over the pad and set her down facing the dreaded elevated highway. At no point during the approach did I feel like I was about to ram it. I’m also getting a better feel for how close I can approach things when viewed from the cockpit.
Departing 6N5, it was a short flight to the Downtown Heliport of KJRB. Another spot-on landing and I was looping south of Governor’s Island to head up the East River and try a new route out to KFRG. Referencing the NY Heli chart, I was planning to take Williamsburg to Track, which would then put me on Meadowbrook for a short time and the transition to Republic. Willamsburg is easy since you’re starting from a prominent bridge landmark and heading towards another visible landmark, the Ridgewood Reservoir. But then I got a little lost trying to pick out the railroad tracks I would follow. I circled and hovered a bit before finally picking them out, although not before mistaking Aqueduct Racetrack for Belmont Racetrack and following the wrong train tracks for a little bit. Once established on the proper route though it was easy, and I had already flown Meadowbrook and Republic before so once I spotted the Nassau Colosseum I was home free.
Another thing that definitely helped was that I spent several hours earlier this week further tweaking FSX to boost my framerates to the point where I was getting 11-15FPS anywhere around Manhattan. This is very important because it is near impossible to fly the helicopter at less than 10-12 FPS. While I got a slight boost from overclocking my graphics card, overclocking my processor didn’t really do squat. Still, cruising around areas without the huge mass of scenery Manhattan puts out, I now have silky-smooth 30FPS. I’d probably drop back down to ~15FPS if I enabled autogen scenery, but I’m content to leave it off.
So I’m back at Republic. I guess I’ll be taking the Cessna out again next time, maybe hit some of the small fields I’ve been remaking to properly align with the satellite ground textures. I have a few more up now on the AVSIM file library – if you’re using MegaScenery Earth you should be using these scenery files too!!
So I’ve been spending the majority of my free time these past few weeks designing scenery rather than flying. Although the satellite scenery I’m using for the NJ/NY/MA/RI area is awesome, it’s a bit of a double-edged sword when it comes to airports. See, the default FSX airports are not designed to match the exact real world layout of tarmacs and taxiways – they come close enough to match the airport diagram so you can find your way around properly, but that’s about it. For example, here is the default Newark Airport and here is my modified Newark Airport (incomplete – just check the taxiways tho). It’s a striking difference. So to that end, I’m embarking on a pretty ambitious project to redo all the airports in the satellite coverage area to match the ground textures. That’s well over 100 airports!! So far, in the last week and a half I’ve done twelve (at the time of this post) – but they’ve all been small single-strip fields without much infrastructure to deal with. Still, that’s pretty good progress. Hopefully I can find some way to turn a small profit from this – still working on that but I have some ideas.
However I can only design for so long before I miss flying so I finally hopped back in the cockpit for some night time and day time VFR.
I decided I was done with the Osprey for now, I just didn’t want to take the time to learn to land it properly although it is a pretty fun craft to fly – however the lack of a true VTOL capability that is present in the real thing just makes it kind of lame. I needed to shuttle it back to McGuire though, since my Cessna was still parked there as no one was willing to ferry it up for me. I decided to fly VFR since conditions were good, so after departing Falmouth I used the coastline of Massachusetts, a very visible landmark, to travel up to Boston, at which point I simply turned west. I aided my navigation with the help of two VORs but by then it was also light enough to see ground features that led me to my main VFR guide – the Hudson River. Once over the Hudson it was a simple matter of following the river all the way down past Manhattan and then sticking to the coast of NJ before picking up the VOR for McGuire to turn inland for the airport.
Along the way I originally planned to fly around 4-5 thousand feet, as that was high enough to easily clear the largest obstacle in my flight path (important when you’re flying VFR at night!) but I bumped it up to 10,000 feet because traveling that low at close to 200knots didn’t give my PC enough time to load the higher-resolution textures. Flying higher made this better. At that height though I did have to dodge a few clouds scattered about.
Coming in to land at McGuire I was back to the problem of setting this bird on the ground in one piece. The most frustrating thing about landing this thing is I could not find a power setting while the blades were fully up that allowed for a nice, slow descent to the runway. It would start slow, but then all of the sudden I would be dropping at over 500 feet per minute! Not good! So I would pour on a bit of power, stabilize my descent but then before I could decrease power a bit to try and slowly bring her down I would start to climb out! I made it 3/4 of the way down the blasted runway before I finally just said screw it and basically did an air carrier “crash” landing and prayed my gear would stay attached. Somehow I actually almost nosed over – no idea why, but finally settled on all wheels and was able to taxi off the runway and to parking without further incedent.
The Osprey is a pretty cool plane, and maybe one day I’ll return to it to try and master its landing, but boy does it irk me. On this flight down from MA I finally had to engage the autopilot because it’s pretty impossible to trim it out stable. The Navigation screen only allows you to set a intercept course for Nav1 – Nav2 simply acts as an ADF. Anyways it’s good riddance for now, as I gratefully climbed back behind the yoke of my trusty old Cessna 172.
Using the Cessna I took myself west to the coast of NJ and followed that north up to Long Island. I had to request clearance to transition the JFK Class B airspace but this early in the morning it wasn’t a problem. I skirted the coast and called into KFRG for landing instructions – they told me to make right base for Runway 14… while I was still 17 miles out!! Lesson learned: don’t radio into airports via the default FSX AI until you’re more like 5 miles out in a slow pokey Cessna. I was still 7 miles away and only going like 80 knots since visibility had dropped to 9SM and I was still trying to find the airport, when ATC held some poor bastard in a Beechcraft short of the runway while I completed my base to final. Boy he was in for a bit of a wait! Then a King Air on GPS approach to Runway 14 had to go around while I still trundled slowly along. Finally I picked up the runway lights and completed my base turn to final – right on the glide slope. Then things went a bit screwy as I realized – hey I don’t have vertical-shifting rotor blades to slow me down almost instantly to my landing speed! Here I am on short final still pushing around 80 knots! So I was all scrambly to lower speed, then lower flaps, and kind of drunkenly slammed her down onto the asphalt. It was a horrid landing. Thanks, Osprey. Although I could have called a go-around too I suppose. That’s one bad thing about the sim, you’re more willing to just say “screw it, I’ll get her down!” where in real life you would have instantly thought “uhhh… I’d better pull out and give this another shot.”
Anyways I taxied to my assigned parking and then hopped into the Jet Ranger for the final leg of my day’s flight. I took off from KFRG and followed routes that took me past JFK and lined me up perfectly for an approach across the Hudson to East 34th St Heliport (6N5). I swear I was mere inches from slamming into the elevated highway (again) so I kind of dropped her hard onto the landing pad. Turns out I was still several feet away and safe – still need to get used to the perspective of how close things appear from the cockpit. I didn’t stay long, immediately lifting back off (after catching my breath) and flying down the East River to downtown and the Wall St Heliport (KJRB) where I made a much, much smoother landing on the pad. After that it was a hop up the Hudson to Midtown Heliport (KJRA). However I got fed up trying to land while my PC was stuttering along at like 5FPS (need 10-11 at least) and pulled out to just continue my flight.
Side note about KJRA though – I was up in NYC at the Javits Center for New York Comic Con this past weekend and it was so nice out I spent a good 3 hours outside taking a break from the convention hall – most of that time was spent sitting next to the Midtown Heliport in real life watching some helicopters land and depart to get a better idea for how its really done. Unfortunately the majority of the traffic goes in and out of Downtown/Wall St and only 2 helicopters took off and 1 landed. You can stand literally 50 feet from a chopper though in their parking lot – I arrived just in time to witness the take off of a twin-turbined Sikorsky – wow! I had to lean into the wind that sucker pushed out when it lifted off. Then a smaller 4-person heli approached and landed, idled on the pad until finally a guy showed up with three small dogs, loaded them all up into the chopper and away they went!
Anyways, that little sojourn was mildly educational, now back to the flight. I left the city behind as I flew north along the Hudson. My destination was actually an airport I added to the simulator called Haverstraw Heliport (H43). It’s one of the few public heliports in the region (the other I’ve found so far being 87N out on Long Island) and really does offer up a great excuse to fly along the Hudson, which is very scenic. Still VFR, I found the airport no problem with no navaids needed and as per instructions I descended over the grass field before hover taxiing over to land on the tarmac. Once again the perspective from withing the cockpit had me thinking I was flying into some of the trees that ring the very tiny field. I never really noticed this before but it becomes readily apparent in tight spaces.
After landing I did a manual systems shut down and remembered to save the flight so I will restart at the same airport and need to run through all the manual start up tasks.
I’ve also finally dabbled with overclocking my system to try and eek out some more performance since I cannot afford an i7 chip/mobo upgrade until at least early next year. Right now I’m running my 2.4GHz E6600 at 3.11GHz and I’ve completely maxed out my graphics card to 900MHz clock/1300MHz memory. Normal operations have the system running stable, and I’ve done some stress testing as well – no crashes yet! Hopefully soon I’ll be able to hop back into the cockpit and see how my game performance is affected.